 Real
Name: Tuck
Real
Name: TuckTUCK
Real
Name: Tuck
Identity/Class: Extraterrestrial (Lionheart) replicated
organic (artificial
humanoid; see comments);
later mutated by the
Sapphire Lotus
Occupation: Adventurer;
former prostitute (presumably, as part of a "cat-house")
Group Membership: Former member of the Sisters of the Holy Hassock
Affiliations: Partner of Death's Head (Minion); Death's Head,
Lady Anula of Lionheart, Avengers of Earth-9939
("Earth-Charnel"; in
particular: Captain America , Rhino, Scarlet Witch, She Hulk,
Wolverine), the Merry Men of Lionheart (Much, O'Nary,
Shallowfoot, Took, and others), Die-Cut, the Doctor, Heron, Kadagar
Gang, Light Brigade, Motormouth, Dr. Noon, people
of Numeropolis (employed Death's Head), Phaedra, Professor
X (Charles Xavier), Requiem Sharks, the Temploids, Ultra-Marine
Captain Jeanet Hutch, Warheads Kether Troop, X-Men, Yorick of Lionheart;
formerly, Killpower,
Wrathchilde
Enemies: Alkemist, AIM of
Earth-616, Audit, Avengers of Earth-616, Battletide, Bezial, Black Curator,
Charnel, Charnel of Earth-Charnel, Cicatrice, cyborgs of the
Black Museum, Death's Head 3.0 cyborgs of Earth-616, Hob, Killpower,
Kite, Lord High Protector
of Lionheart, Ludites, Major Oak and his Huscarls, Methinx, Mister Lorson, Mys-Tech,
Dr. Necker, Raptors, the Sisters of the Holy Hassock on
Lionheart, the staff of Tansteele Research Centre,
Wrathchilde;
formerly the Kadagar gang, Light Brigade, Warheads Kether
Troop
Known Relatives: Inapplicable (unless you count her unidentified creator)
Aliases: Specimen One Eight Eff (18F)
Base of Operations: Mobile across time and space;
initially Lionheart;
First Appearance: Death's Head II#3 (May 1992)
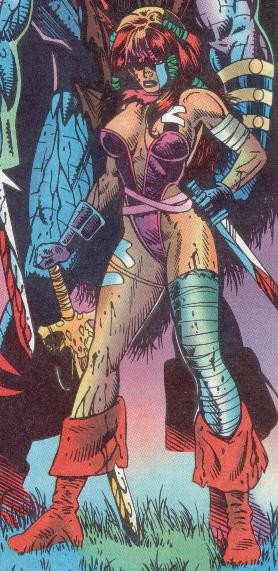
 Powers/Abilities:
Tuck has a replicated organic humanoid body. This -- and her years of surviving in the
harsh conditions on Lionheart -- would appear to
made her stronger than an average woman of her build, giving her
athlete stamina and strength. She has athletic agility and is very acrobatic.
She has developed stealth from years dwelling in the
forests of Lionheart. She has superior skill in hand to hand combat and is
experienced in the use of various weapons such as swords, knives, crossbow's
and guns.
Powers/Abilities:
Tuck has a replicated organic humanoid body. This -- and her years of surviving in the
harsh conditions on Lionheart -- would appear to
made her stronger than an average woman of her build, giving her
athlete stamina and strength. She has athletic agility and is very acrobatic.
She has developed stealth from years dwelling in the
forests of Lionheart. She has superior skill in hand to hand combat and is
experienced in the use of various weapons such as swords, knives, crossbow's
and guns.
She was later mutated by the Sapphire Lotus and her strength and endurance were raised to approximately Class 100. She also gained the ability to manipulate energy to great extent.
Later with the shard of the Sapphire Lotus her strength was equal to that of "five fighting men" giving her enhanced human strength (able to lift or press around 1 ton; see comments; she can tear chains from stone walls or break woven tungsten composite chains). She also developed enhanced human durability, speed, stamina and incredible recuperative powers. Since then, her agility appears to be peak human. She has a phenomenal tolerance for cold, having fought a pitched battle with guard robots at minus sixty degrees Celsius. She did appear to feel the cold slightly, but it didn't slow her down. Her stamina is such that Alkemist's people needed to use double strength tranquilizers on her. When struck by the immensely strong giant robot Hob she was stunned, but suffered relatively little damage and recovered quickly.
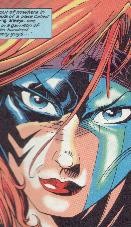
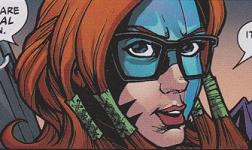
Her facial markings were actually tattoos, and while they varied some with artistic interpretation, they're there for keeps!
Height: 5'3" (in comparison to Death's Head)
Weight: 223 lbs. See comments.
Eyes: Blue
Hair: Red
History: (Death's Head II#3(fb)) - Tuck was created by an unidentified tissue broker on Lionheart. When her creator found our what the authorities would do to him for creating a replicate, he sold her to a Cat-House.
(Death's Head II#3 (fb) - BTS) - Tuck left the Cat-House under circumstances she has yet to reveal.
(Death's Head Gold#1 (fb) - BTS) - Tuck spent years dwelling in the forests of Lionheart and developed stealth.
(Death's Head II#3 (fb)) - When Tuck heard about Hood (aka Death's Head) and his outlaws, she began hunting them in order to join them. She hunted for months, traveling across half the planet. She joined the Sisters of the Holy Hassock, who were on the trail of Hood.
(Death's Head II#3) - Tuck and the Sisters traveled out of Finders Keep at dawn and were ambushed by the outlaws. Tuck helped Death's Head and convinced him to let her join his outlaw band. After a fierce battle in which most of his associates where killed by Major Oak and his huscarls, Dr. Evelyn Necker (Death's Head's creator) appeared and convinced Death's Head to return and protect A.I.M. Meanwhile, back in Reality-8410's year 2020 AD (in which Death's Head had been created as Minon), Baron Strucker the 5th had merged his body with that of the previous Death's Head mechanoid and become Charnel, who subsequently killed Spratt. By the time that Death's Head, Necker and Tuck arrived at A.I.M. Central, the base had already been attacked, and Charnel had stolen a time belt and traveled back to Reality-616's modern era in an effort to destroy A.I.M.'s past.
(Death's Head II#4) - Death's Head, Necker and Tuck traveled back to the modern era, Earth-616, arriving at a Manhattan shopping mall (within the former World Trade Center), which would one day be the site of A.I.M. central in the 2020 timeline (see comments in Dr. Necker's profile). They encountered a group of Avengers from Earth-9939 (aka "Earth-Charnel)". Together they fought Charnel, but during the conflict the villain absorbed energy from the alternate Scarlet Witch and became even more powerful, turning into the creature that would devastate the future from which she had come. Death's Head placed a second time belt on Charnel and, using what was left of her hex power, the Scarlet Witch activated them both. Charnel was torn in two, one half flung into prehistory, the other into the thirtieth century. Her timeline seemingly negated, and fellow Avengers dead at Charnels hands, the Scarlet Witch vanished. Death's Head and Tuck stole a truck and drove off to explore Manhattan, followed by a good portion of that city's superhuman population, who had come to investigate the powerful energies recently unleashed.
(Warheads#5) - Death's Head and Tuck were approached by a man from Numeropolis while in a road side cafe somewhere in the USA. He said that he wanted Death's Head to find a very special gun, showing him a picture of Tigon Liger of the Warheads.
(Warheads#6 (fb) - BTS) - Death's Head and Tuck accepted a contract with the people of Numeropolis to retrieve (or at least obtain payment for) the gun Clementine, which had been claimed by Liger.
(Warheads#6) - On an unidentified planet, Death's Head and Tuck caught up to the Warheads Kether Troop after they had located the wizard Genghis's power source: the Sapphire Lotus.
(Warheads#7) - An alien army appeared in the distance,
charging towards them at great speed. The Warheads managed to
channel the energy of the Sapphire Lotus, blasting away both the army and Death's Head,
but the cyborg quickly recovered. As the army's numbers continued to grow, the
Warheads decided to work with him temporarily. When the powerful being known as
Audit showed up to attack them, Death's Head pretended to offer
up Tuck as a sacrifice to Audit, distracting him while the
Warheads blasted Audit with the power of the Lotus. However, Liger then used his
gun, Clementine, to stun Death's Head and Tuck. After recovering, Death's
Head and Tuck decided to cut their losses, stealing the
Sapphire Lotus, but leaving behind the gun Clementine.
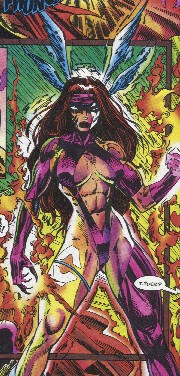
(Death's Head III#1) - Back on Earth, in Paxton, Oregon, the energies of the Sapphire Lotus continued to draw others to Death's Head and Tuck, including a large number of superhumans, including Wrathchilde, and the X-Men. While Death's Head fought the X-Men in ye olde case of mistaken identity, both Tuck and Wrathchilde began to be changed by the Sapphire Lotus, and they teleported away together through a dimensional gate.
(Death's Head III#2) - Wrathchilde and Tuck arrived at his home in Chicago, where they were followed by Death's Head and the X-Men, who had finally reached an understanding and teamed up to recover the Lotus. Mad with power, Tuck fought alongside Wrathchilde against their pursuers, until the arrival of the Raptors.
(Death's Head III#3) - Having been sent to retrieve the
Lotus, the Raptors attacked everyone else present,
injuring both Tuck and Wrathchilde. However, Wrathchilde recovered and took the Sapphire Lotus
back to its realm of origin, leaving Tuck behind, suffering from
a severe case of withdrawal...and a nasty wedgie.
Death's Head, the wounded Tuck, and the X-Men suddenly
vanished.
(Death's Head III#4) - They were transported by
Phaedra -- creator of the Sapphire Lotus -- to her realm. The power of
the Sapphire Lotus had enabled Wrathchilde to wrest control from its
creator, and he sent
Phaedra's own Raptors after her. Jubilee watched over Tuck as the
X-Men and Death's Head fought the Raptors, their combined power
defeating them easily. Phaedra disguised herself as Tuck in order
to distract Wrathchilde so that Jubilee could boost her powers
with the Sapphire Lotus. Jubilee and Death's Head overloaded
Wrathchilde with power and he exploded.
Phaedra gave Tuck a shard of the Lotus
and sent her to her homeworld of Lionheart to recover. Death's Head asked to be
sent after her, but was pulled into several other conflicts.
(Death's Head III#6) - Tuck awoke on Lionheart, in a garrison at Finder's Keep, suffering from a temporary memory blank. She was attacked by soldiers, and defended herself. She noticed that her strength had increased as she made her way to through the garrison to the top of a turret. Having nowhere else to go, she leapt down through several awnings in the hope they would slow her descent, and her increased strength/durability prevented her from breaking any limbs. She stole a pterodactyl from the garrisons air squadron and escaped, only to be shot down over a forest. She landed in the traveling theatre of Will Wavepyke and found herself cast in a leading role.
(Death's Head III#7) - Not
exactly thrilled at the idea of performing in front of the Lord
High Protector, Tuck was about to make an excuse and leave when
she saw Death's Head, who had ended up getting captured by Major
Oak while looking for her. She took to the stage with a crossbow
behind her back and freed Death's Head. Major Oak attempted to
stop her, but she cracked him in the head with a candle holder.
As Death's Head and Tuck made their way though the castle, Major
Oak caught up with them again. Death's Head gave him a slash with
his blade configuration for good measure, and they made their
escape through the castle wall. While swimming through the moat,
Death's Head lost his time belt in a tussle with a plesiosaur.
While they recuperated in a nearby forest, Yorrick appeared to warn Death's Head that Methinx was after him.
(Death's Head III#8) - Methinx attacked and seemingly had Death's Head at his mercy. Tuck shot Methinx with a crossbow bolt, but he shrugged it off and trussed her and Yorrick to a tree with animated creepers. Tuck broke free only to be stunned by Methinx's explosion. Death's Head threatened to expose Methinx as a technology user to the Lord Protector if he didn't help them leave Lionheart, and they left via Methinx's dimension gate on a quest to discover Death's Head's true identity.
(Death's Head III#9) - The dimension gate deposited Death's Head and Tuck in Los Angeles Conurbation, near A.I.M. Central-8410 circa 2020 AD, at a point in time before the Minion cyborg had assimilated Death's Head's instincts. Just as Tuck was expressing her concerns that meddling with his own origin could be dangerous, the Light Brigade appeared to prevent Death's Head from altering his own past. Death's Head battled the Light Brigade and won, but they offered to send him after Dr. Necker who had traveled into the past after creating the Minion cyborg. The Light Brigade summoned a time flare sending Death's Head and Tuck into the past.
(Battletide#1) - Death's Head had retreated to a secluded monastery high in the Himalayan's, Tibet, but he and Tuck were commissioned by Algernon Crowe, of the Mys-Tech board to recapture Killpower. Death's Head and Tuck found Killpower on the South Pacific island of Kamuni Atoll , where he was vacationing with Motormouth. As Death's Head and Killpower fought, Motormouth tackled Tuck and opened a warp in order to deposit her somewhere else.
(Battletide#2, 3 - BTS) - Death's Head and Killpower were pulled into a set of Games then culminated in a battle against Termagaira and the Battletide.
(Battletide#4 (fb) - BTS) - Meanwhile, Tuck and Harley quickly became friends and had a shopping spree on the planet Aldebaran.
(Battletide#4) - Tuck and Harley returned to Kamuni Atoll and were reunited with Death's Head and Killpower. Death's Head cancelled the contract on Killpower, as the youngster had repaired the cyborg's body when it had been torn to pieces fighting the Battletide.
(Battletide II#1) - Returning to his quest
for his true identity, Death's Head and Tuck began attacking A.I.M.
Data Complexes in the modern era. They attacked one in South America. Inside an Ice Borg (an immense
supercomputer complex functioning in hyper-capacity due to the
extreme cold), Tuck noted that the cyborgs and robots used by AIM
in that era were likely his predecessors.
Their quest was interrupted by Killpower, who
burst in to join the fight, but ended up overheating and
destroying the Ice Borg. They were teleported out of the
resultant explosion and petitioned for aid by the Temploids, who
revealed that the Battletide had reformed and was targeting Earth.
(Battletide II#2) - In order to stop the Battletide, they first had to overcome the Hulk, whom it had enslaved. They also had to overcome a techno-virus that had been set upon Death's Head by Bezial, one of his former assimilation victims. Tuck stayed behind with the Temploids while Death's Head and Killpower journeyed into the Battletide itself. She became concerned when they quickly lost contact with with Death's Head.
(Battletide II#3) - In order to fend off the Battletide, Death's Head and Killpower sought the aid of one of the oldest Temploids, Gabriel. Unaware of this, Tuck continued to try and make contact with Death's Head and also kept a watchful eye on the Hulk, who struggled to get free of the Temploid force-sphere imprisoning him. Meanwhile, Death's Head, Killpower and Gabriel eventually confronted Bezial, only to find that he had taken possession of Termagaira
(Battletide II#4) - Bezial overpowered Death's Head and Killpower, and then shattered Gabriel. Death's Head rallied to fight Bezial, while Killpower rebuilt Gabriel. Death's Head succeeded in reassimilating Bezial. With Termagaira incapacitated, the Battletide turned away from Earth. Death's Head, Tuck, Killpower, and the Hulk were all returned to Earth.
(Death's Head III#10 (fb) - BTS) - The AIM data complex destroyed in their encounter with Killpower was one of three such complexes targeted and destroyed by Death's Head and Tuck in the space of three weeks.
(Death's Head III#10) - Death's Head searched another AIM
complex for info on his own identity. Instead he discovered the identity of Dr.
Necker's mother, Eliza
Necker, and decided to look for her, despite Tuck's misgivings.
She was concerned that meddling with his creation would wipe
Death's Head from the timeline, meaning that Tuck would be
stranded on Lionheart. Just as Death's Head promised her he would
play safe, the Requiem Sharks attacked. Death's Head thought Tuck
might have been dead and trashed two of them, only to be brought
down by the one called Stealth. Tuck reappeared just in time to
save him, and Death's Head tore the Requiem Shark's helmet off.
That was when they realized that Stealth was in fact Eliza Necker.
Informing Eliza that he knew her future daughter, Death's
Head talked her into finding out that daughter's whereabouts. Learning that
Evelyn was at Pacific Vista Complex in California, Death's Head and Tuck where
about to leave when they overhead Smart mention the Minion project.
(Death's Head III#11) - Death's Head convinced Eliza and the Requiem Sharks to help him. While the Requiem Sharks bought a car, Tuck disguised herself. She drove into the laboratory with Death's Head hidden in the trunk of the car. As they infiltrated the lab, they encountered a new Minion cyborg that had been built around Kite. Kite then revealed himself to be the past half of Charnel, transferred his future self to the lab, and joined with him to become Charnel again.
The combined forces of Death's Head, Tuck, the Requiem Sharks and A.I.M's security weren't enough to stop Charnel directly, but Dr. Necker activated a synapse disrupter in his brain-stem. While Charnel was dysfunctional, they attempted to stop him with a temporal warp. Charnel attempted to absorb the temporal energies but Death's Head shot him and made him overload.
(Death's Head & Die-Cut#1 (fb)) - Back on Lionheart, Death's Head and Tuck were hired by Lady Anula to cure the plague Perfection, which was transforming organic replicants into metal and killing them.
(Death's Head & Die-Cut#2 (fb) - BTS) - Secretly Tuck was infected with a harmless, self-limiting variant of Perfection, in hopes that this would increase the urgency of discovering the cure.
(Death's Head & Die-Cut#1) - Following Anula's directions, they sought to find the cure from the cyborgs of Matricca Scoppio. While there, Death's Head was infected with a purging program that began allowing some of his assimilated personalities to resurface. When he and Tuck were on the verge of being overwhelmed by the cyborgs, Death's Head was convinced to allow one of the personalities, Die-Cut (who was familiar with the layout of Matricca Scoppio) to temporarily take over. Die-Cut's personality led them to the Black Museum of Cyborgs in Orgolhuin, where it recreated it's body and weapons, and then downloaded/purged itself from Death's Head. In the midst of the struggle, Tuck realized that she, too, was suffering from Perfection.
(Death's Head & Die-Cut#2) - Restored to life, Die-Cut was temporarily
overcome with madness from his cyber-phobia and his experiences
and attacked Death's Head. When the Black Curator of the Museum
and its cyborg armies attacked them, Die-Cut regained his sanity,
and created a weapon to destroy the cyborgs of the Black
Museum. Die-Cut then led them on a quest that showed that the
Black Museum could not cure Perfection or any other diseases, but
rather it could just grant immortality to those who remained
within a certain chamber, but only as long as they remained there.
After revealing the failure of their mission
to Lady Anula, Death's Head and Die-Cut went their separate ways. Anula revealed
that Tuck's strain of Perfection was harmless and soon disappear.
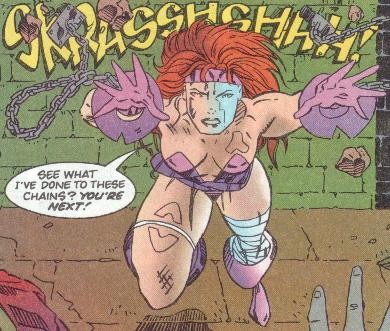
(Death's Head III#13 (fb) - BTS) - Death's Head and Tuck traveled to Clinton City, Mars @ 2026 AD of Reality-49327, to lay low from A.I.M. using one of their own time dish's. At some point Tuck was abducted by the Alkemist and Mr. Lorson.
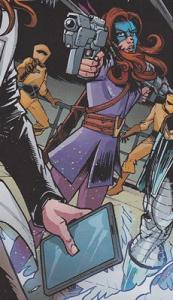
(Death's Head III#13) - Tuck awoke in a cell, chained to the wall. Breaking free, she attacked her captors, but Alkhemist flung her against the wall and stunned her. Alkemist chained her back and began to devise electronic shackles to neutralize her strength.
(Death's Head III#14 - BTS) - A golem duplicate of Tuck was created and managed to escape.
(Death's Head III#15) - The duplicate encountered Death's Head who tricked her by giving her neat pharmocyl to drink instead of water. The golems lack of taste gave her away and Death's Head destroyed her. Crowe and Wychwood arrived from the past, revealing that Mys-Tech were funding the Golem operation, and cancelled the contract in order to avoid confrontation with Death's Head. Death's Head killed Lorson and was reunited with Tuck, but unbeknownst to them the Alkemist escaped vowing revenge. Death's Head and Tuck decided to stay on Mars for a while and visit the Olympus mountains.
(Death's Head Gold#1 (fb)- BTS) - Death's Head and Tuck somehow learned that his men on Lionheart had been infiltrated by agents of Major Oak, who had been supplied with the technology to do so by General Cicatrice. This was done so the group was weakened from within, allowing Death's Head's men to be decimated. Death's Head also learned that a man called Noon, on Catspur was involved, and as Cicatrice was shielded, he and Tuck went after Noon. Death's Head and Tuck arrived on Catspur on a personal mission to punish Noon for the deaths of his men on Lionheart.
(Death's Head III#14/2 // Death's Head Gold#0) - Following a lead to the south pole around Garrick 6, their ship flew right into an energy blast--unleashed by Cicatrice in an effort to cover up his involvement on Lionheart. This blast slew everyone on Catspur expect the two within Garrick 6--Noon and his ally, Heron. Tuck vanished, and Death's Head assumed her to be dead.
(Death's Head Gold#1) - Tuck found herself in England. She contacted Phaedra, and with some help from Professor X they tracked Death's Head so Phaedra could send Tuck to him. She found him impaled on a huge jagged piece of rock, badly injured after an attack by Cicatrice's agents (posing as Temploids). Tuck fought off the fake Temploids with help from Heron. Death's Head managed to drag himself off the rock, and Heron fully recharged Death's Head after he convinced her that he was innocent of the blast that slaughtered the people of Catspur. They joined forces against the remaining fake Temploids and went after Cicatrice, who escaped. Death's Head and Tuck found themselves trapped in the ship, which was in a deteriorating orbit and headed to crash into Catspur.
(BTS) - In unspecified circumstances Death's Head and Tuck escaped from Cicatrices ship. see comments
(Incomplete Death's Head#1) - Hob, a malevolent robot who had faced the Freelance Peacekeeping Agent Death's Head, set up shop on the odd chronal planet called Maruthea, where normal time did not exist. Hob began searching normal time and space for information on the previous Death's Head, but encountered a number of complications over his three million year search.
The Doctor discovered the activities of Hob. Deciding that Hob must be stopped, the Doctor transported Death's Head (Minion) with his partner Tuck to Hob's base. Death's Head and Tuck, unaware that the Doctor had transported them and of where they were, attacked Hob's defense robots, quickly defeating them. Death's Head then patched into Hob's databanks, eager to learn about the original Death's Head, but became trapped in virtual reality. Tuck could not revive him.
(Incomplete Death's Head#2) - Tuck watched various images from the previous Death's Head's adventures on a computer screen as the current Death's Head remained comatose.
(Incomplete Death's Head#3) - Death's Head communicated with Tuck from another computer screen. He stated that he was trapped in v.r. and informed Tuck as to their location on Maruthea. Death's Head disappeared from the screen, as Hob advanced on Tuck.
(Incomplete Death's Head#4) - Tuck watched footage of the Doctor's encounter with Keepsake, but Hob continued to advance on her. Tuck sensed his approach.
(Incomplete Death's Head#5) - Death's Head talked with a v.r. representation of the previous Death's Head. From cyberspace, he observed Hob advancing on Tuck.
(Incomplete Death's Head#6) - Hob hurled Tuck across the room.
(Incomplete Death's Head#7) - As Hob held Tuck high in the air, she exhorted Death's Head to wake up. Upon hearing her refer to her partner as Death's Head, Hob felt puzzled. Hob had no knowledge of this Death's Head's existence.
(Incomplete Death's Head#8) - Hob asked Tuck to explain why Death's Head no longer resembled his old self. Tuck demanded to know who Hob was.
(Incomplete Death's Head#9) - Hob showed Tuck footage from his past and explained his desire to find Dogbolter.
(Incomplete Death's Head#10) - Tuck confronted Hob with the possibility that Dogbolter died in the explosion of the Dogbolter Temporal Rocket, and thus that Hob's efforts to locate him were in vain. Hob could not accept that his master was dead, and lashed out at Tuck.
(Incomplete Death's Head#11) - Hob stopped attacking Tuck when he saw Death's Head-FPA arriving at Bonjaxx's party on Maruthea, which was occurring "simultaneously" due to the non-temporal nature of that world.
(Doctor Who Magazine#173 - BTS / Incomplete Death's Head#12) - After the Doctor left Bonjaxx's party, Hob attacked the Death's Head-FPA, but Death's Head (Minion) came to his rescue. Together, the two of them destroyed Hob. The Doctor explained to Death's Head (Minion) how he had sent him and Tuck to Maruthea to thwart Hob, and then he watched them leave.
 (Revolutionary War: Death's Head II#1 (fb) - BTS) - Death's Head (Minion) was
hired to capture Captain Britain. Suspecting something amiss, he asked Tuck to
contact his former self for back up. Tuck hired the
original Death's Head, telling him the job she needed him to do would be
priceless. While waiting for a signal from her partner, she took the earlier
Death's Head to the Tansteele Research Centre on the planet Eopia where they
attacked the vivisection unit of the Robotic Medical Research facility.
(Revolutionary War: Death's Head II#1 (fb) - BTS) - Death's Head (Minion) was
hired to capture Captain Britain. Suspecting something amiss, he asked Tuck to
contact his former self for back up. Tuck hired the
original Death's Head, telling him the job she needed him to do would be
priceless. While waiting for a signal from her partner, she took the earlier
Death's Head to the Tansteele Research Centre on the planet Eopia where they
attacked the vivisection unit of the Robotic Medical Research facility.
(Revolutionary War: Death's Head II#1) - Reinforcements arrived to defend the facility, and Death's Head fought them off while Tuck freed the artificial lifeforms they had come to save. Death's Head enquired about his fee, but Tuck explained that she needed Death's Head to save his future self. They time jumped away together. Arriving at Darkmoor Research Centre, they found Death's Head (Minion) being examined by Dr. Necker. Necker took control of the Minion cyborg, forcing Death's Head to fight his future self. He won by stabbing his future incarnation in the head, causing the Minion cyborg's systems to reboot. The two Death's Head's teamed up to fight Necker's other cyborgs, while Tuck chased after Necker and tried to get her to shut the drones down. She managed to destroy Neckers remote, but was attacked by one of the cyborgs, giving Necker a chance to flee.
(Revolutionary War: Death's Head II#1 (fb) - BTS) - Tuck decided to head back towards the two Death's Heads, but was followed by more cyborgs and Necker's AIM associates.
(Revolutionary War: Death's Head II#1) - Death's Head (Minion) defeated the enemy cyborgs using a Trojan virus he had uploaded earlier. Both Death's Head's were then stunned by a large concussion cannon operated by Dr. Necker herself. Necker took Death's Head's unconscious body and set the research centre to self destruct, leaving Tuck and the future Death's Head to be caught in the explosion.
 (Revolutionary War: Omega#1 (fb) - BTS) - Captain Britain, the Death's Head
mechanoid, Albion, Dark Angel, Colonel Liger, and Dai Thomas were used by the
Psycho-Wraith Prime to open a gateway to Mephisto's Hell. Death's Head and Tuck
arrived at the Shard to find it under attack. They learnt that Killpower was
somehow responsible.
(Revolutionary War: Omega#1 (fb) - BTS) - Captain Britain, the Death's Head
mechanoid, Albion, Dark Angel, Colonel Liger, and Dai Thomas were used by the
Psycho-Wraith Prime to open a gateway to Mephisto's Hell. Death's Head and Tuck
arrived at the Shard to find it under attack. They learnt that Killpower was
somehow responsible.
(Revolutionary War: Omega#1) - Death's Head and Tuck began climbing up the side of the Shard to reach Killpower, followed by Pete Wisdom. As they reached the top, Captain Britain was awakening. Cap attacked the cyborg, but Death's Head explained about Psycho-Wraith Prime, Killpower, and Hell's invasion of Earth. Killpower attacked both Death's Head's, while his demonic troops attacked the other heroes present. When Motormouth arrived with reinforcements, Killpower came to his senses after being hit by her sonic scream. He begged her to kill him. Captain Britain objected, hoping for a better way, but Death's Head's, Joseph Hauer, and Colonel Liger opened fire. Killpower apparently died, and Dark Angel closed the wormhole by draining energy from the demons.
 (Revolutionary War: Omega#1 (fb) - BTS) - Tuck and both Death's Head's stayed
around for a while after the battle at the Shard until they got an offer they
couldn't refuse.
(Revolutionary War: Omega#1 (fb) - BTS) - Tuck and both Death's Head's stayed
around for a while after the battle at the Shard until they got an offer they
couldn't refuse.
(Revolutionary War: Omega#1) - Death's Head eventually left London with Tuck and his former self, who announced that they needed to talk about the future.
Comments: Created by Dan Abnett and Liam Sharp
The term "Replicated Organic" is used
to describe Tuck. She has human flesh and blood, but is still
considered an artificial lifeform, and therefore illegal,
according to Lionhearts laws. I like the term Replicated Organic,
it reminds me of the idea behind the Vision and Hank Pym's term
"Synthozoid", though Vision isn't organic.
She could have been created by genetic engineering, like Adam
Warlock, or she could be clone--Snood.
Here's how I calculated her strength level with
the shard of the Sapphire Lotus. There was a line in Death's Head
Gold that she had the strength of "five fighting men".
Working on the basis that fighting men would probably have
athlete strength and be able to lift twice their body weight (on
average about 400 pounds) 5 fighting men would be able to lift
about 2000 lbs., which if I'm not mistaken is 1 ton (enhanced human
strength). Peak human strength supposedly allows you to lift 800 lbs.,
multiply that by 5 and you get 4000 lbs., or 2 tons. I have since edited the
abilities section and limited this to 1 ton, interpreting it as though her own
athlete strength was enhanced roughly five times. Although there is plenty of
evidence that Tuck was already strong before exposure to the Sapphire Lotus,
there is little to suggest she could lift upward of 400lbs. She is clearly in
the enhanced human range now, lifting adult men with one hand, breaking metal
bonds easily, that sort of thing. - Changeling.
Four hundred pounds is a lot of weight to lift, and I'm not
sure how many fighting men can lift that, but then, we are talking about the
comic book world. Daredevil was listed as being able to lift 500 pounds, in the
original or Deluxe OHotMU, if I remember correctly.
In coming back to this profile to add the Revolutionary War information, I've took the opportunity to expand it a little. I've added Height and Weight information, approximations based on how tall she appears next to Death's Head. Her weight may appear high for a female of her size, as I have added a few pounds on to reflect the fact that she is a Replicated Organic with durability enhanced by her shard of the Sapphire Lotus. Not that those extra pounds are showing! I've also took another look at her abilities. I had previously described her agility as enhanced human, but in looking back I can't find any feats other than some very acrobatic leaping around - the sort of thing Daredevil manages with only peak human agility. So I have knocked her back down to that level, until further evidence comes along to suggest otherwise. I may have meant that her agility had BEEN enhanced by the exposure to the Sapphire Lotus, which would be accurate. Also, I've described some examples of her in action that give a better idea of her durability.
Tuck's name was an obvious tip of the hat to Friar Tuck (more likely to have been Frere Tuck). However she was more like a modern Maid Marion. And doesn't she look pretty in the mug shot I chose of her (to the left of the Powers/Abilities section. The pic is the work of Simon Coleby)!
My thanks to Per Degaton for his summary of the Incomplete Death's Head issues. He had some comments on that series:
The Incomplete Death's Head was a reprint series that covered Doctor Who Magazine#135, Death's Head I#1-10, Marvel Comics Presents#76, She-Hulk II#24, and a few other appearances of the original Death's Head. However, each issue had a framing sequence that included original material with the current Death's Head and Tuck, hence the series is covered here. -- Per Degaton
The BTS after Death's Head Gold refers to events planned for the next part of the Death's Head Gold trilogy. That trilogy was never completed but here's an insight from Liam Sharp:
Check out the LIAM SHARP GALLERY for more of his work.
The future version of Death's Head that Liam refers too would be none other than Psyphon, who was featured in a back up story in Death's Head III#14/2, aka Death's Head Gold#0. Thanks again for all your help Liam, hope you like the profile!
Tuck's new look in Revolutionary War comes complete with a cute pair of glasses. I think these are a fashion accessory, as she doesn't appear to need them for the big fight with the Warguard cyborgs. She previously wore glasses as part of a disguise in Death's Head III#11.
Profile by Changeling and Snood.
CLARIFICATIONS:
Tuck has no known connections to:
images: (without ads)
Death's Head II#3, p17, pan1
Death's Head III#6, p4, pan2
Death's Head III#2, p20, pan3
Death's Head III#13, p15, pan5
Revolutionary War: Death's Head II#1, p
Revolutionary War: Death's Head II#1, p
Revolutionary War: Death's Head II#1, p
Appearances:
Death's Head II#3 (May, 1992) - Dan Abnett (writer), Liam Roger McCormack-Sharp (pencils), Andy Lanning
(inks), John Freeman (editor), Paul Neary (editor-in-chief)
Death's Head II#4 (June, 1992) - Dan Abnett (writer), Liam Roger
McCormack-Sharp (pencils), Andy Lanning & Liam Roger
McCormack-Sharp
(inks), John Freeman (editor), Paul Neary (editor-in-chief)
Warheads#5 (October, 1992) - Nicholas Vince (writer), Stuart Jennett (artist),
David Leach (colorist), John Freeman (editor), Paul Neary (editor-in-chief)
Warheads#6 (November, 1992) - Nicholas Vince (writer), Simon Coleby (artist),
David Leach (colorist), John Freeman (editor), Paul Neary (editor-in-chief)
Warheads#7 (December, 1992) - Nicholas Vince (writer), Simon Coleby (artist),
David Leach (colorist), John Freeman (editor), Paul Neary (editor-in-chief)
Death's Head III#1 (December, 1992) - Dan Abnett (writer), Liam Roger McCormack-Sharp
with Andy Lanning, Bryan Hitch & Cam Smith (art), Helen Stone (color), John
Freeman (editor), Paul Neary (editor-in-chief)
Death's Head III#2 (January, 1993) - Dan Abnett (writer), Liam Roger
McCormack-Sharp (pencils), Rodney Ramos & Cam Smith (inks),
Helen Stone (color), John Freeman (editor), Paul Neary (editor-in-chief)
Death's Head III#3 (February, 1993) - Dan Abnett (writer), Liam Roger
McCormack-Sharp (pencils), Andy Lanning, Rodney Ramos & Steve
Whitaker (inks),
Helen Stone (color), John Freeman (editor), Paul Neary (editor-in-chief)
Death's Head III#4 (March, 1993) - Dan Abnett (writer), Liam Roger
McCormack-Sharp (pencils), Andy Lanning & Rodney Ramos (inks),
Peri Godbold (color), John Freeman (editor), Paul Neary
(editor-in-chief)
Death's Head III#6 (May, 1993) - Dan Abnett (writer), Simon Coleby (pencils), Andy Lanning
(inks), Lesley Dalton (color), John Freeman (editor), Paul Neary
(editor-in-chief)
Death's Head III#7 (June, 1993) - Dan Abnett (writer), Simon Coleby (pencils), Sean Hardy
(inks), Steve Whittaker (color), John Freeman (editor), Paul Neary
(editor-in-chief)
Death's Head III#8 (July, 1993) - Dan Abnett (writer), Anthony Williams (pencils), Andy Lanning
(inks), Steve Whittaker (color), Stuart Bartlett (editor), Paul Neary
(editor-in-chief)
Death's Head III#9 (August, 1993) - Dan Abnett (writer), Simon Coleby (pencils
& inks), Gary Gravatt, Stuart Bartlett (editor)
Battletide I#1-4 (December, 1992 - March, 1993) - Dan Abnett & Andy Lanning (writers), Geoff Senior (artist)
Battletide II#1-4 (August-November, 1993) - Dan Abnett & Andy Lanning (writers), Geoff Senior (artist),
Louise Cassell (color), Jacqui Papp (editor), Paul Neary (editor-in-chief)
Death's Head III#10 (September, 1993) - Dan Abnett (writer), Douglas Braithwaite (artist),
Inks Inc (inks), Gary Gravatt (colour), Stuart Bartlett (editor)
Death's Head III#11 (October, 1993) - Dan Abnett (writer), Simon Coleby (artist
& inks), Alan Smith (inks), Gary Gravatt (colour), Stuart Bartlett (editor)
Death's Head III#12 (November, 1993) - Dan Abnett (writer), Salvador Larroca (pencils), Andy Lanning
(inks), Gary Gravatt (colour), Stuart Bartlett (editor)
Death's Head & Die-Cut#1 (August, 1993) - Glenn Dakin (writer), John Royle
(art), Sophie Heath (color), Jacqui Papp (editor), Paul Neary (editor-in-chief)
Death's Head & Die-Cut#2 (September, 1993) - Glenn Dakin (writer), John Royle
(art), Sophie Heath (color), Jacqui Papp (editor), Paul Neary (editor-in-chief)
Death's Head III#13 (December, 1993) - Dan Abnett (writer), Salvador Larroca (pencils), Colin Fawcett & Paul Scott (inks),
Gary Gravatt (color), Stuart Bartlett (editor)
Death's Head III#14/1 (January, 1994) - Dan Abnett (writer), Salvador Larroca (pencils), Paul Scott (inks),
Gary Gravatt (color), Stuart Bartlett (editor)
Death's Head III#14/2 (January, 1994) - Liam Roger McCormack-Sharp (writer/pencils), Rodney Ramos & Robin Riggs (inks),
Helen Nally (color), Stuart Bartlett (editor)
Death's Head III#15 (February, 1994) - Dan Abnett (writer), Salvador Larroca (pencils), Paul Scott (inks),
Gary Gravatt (color), Stuart Bartlett (editor)
Death's Head Gold#1 (January, 1994) - Liam Roger McCormack-Sharp (writer/pencils), Andy Lanning & Rodney Ramos (inks),
Louise Cassell (colour), Stuart Bartlett (editor)
Incomplete Death's Head#1-12 (January-December, 1993) - Dan Abnett (writer), Simon Coleby (artist),
John Freeman (editor (and plot for #1)), Paul Neary (editor-in-chief)
Revolutionary War: Death's Head II#1 (April, 2014) - Andy Lanning & Alan
Cowsill (Writers), Nick Roche (Artist), Veronica Gandini (Color artist), Devil
Lewis & Stephen Wacker (Editors)
Revolutionary War: Omega#1 (May, 2014) - Andy Lanning & Alan Cowsill
(Writers), Rich Elson (Artist), Rachelle Rosenberg (Color artist), Devil Lewis
& Stephen Wacker (Editors)
First Posted: 07/14/2003
Last updated: 03/021/2021
Any Additions/Corrections? please let me know.
Non-Marvel Copyright info
All other characters mentioned or pictured are ™ and
© 1941-2099 Marvel Characters, Inc. All Rights Reserved. If you
like this stuff, you should check out the real thing!
Please visit The Marvel Official Site at: http://www.marvel.com
Special Thanks to www.g-mart.com for hosting the Appendix, Master List, etc.!