 MERCHANTS
(MRCTS: Military Response and Covert Techniques Squadron)
of Earth-88194
MERCHANTS
(MRCTS: Military Response and Covert Techniques Squadron)
of Earth-88194
Membership: Henry Clerk, Exorcist, Sergeant Frederick Gramon (aka the Gray Man), Gunner, Hariston, Tony Milano, Marvins and his aides, O'Neill, Oversight, Major Preecit, General Franklin Retler;
Al + 1, Bob & Tony + driver, Bruno, Jack + 1, Rog + 1, unidentified team active in Nicaragua, unidentified subway strike team members
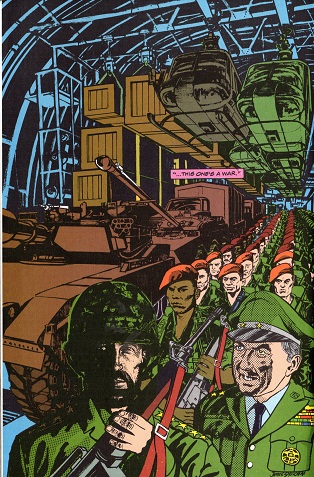
Purpose: To protect the United States of America from any threat, by any means.
Aliases: Merchants is an alias for MRCTS (see comments)
Affiliations: The Merchants allegedly operated out of the United States Department of Defense;
Forbin System, Donald
Gaffney, General John Edward Getzer, Vice-President Dan Quayle and other unspecified US government officials;
the Merchants sought to make Powerline (Lenore Castle, Victor Guillermos) into heroes that would replace Zero in the public eye;
the mainstream Merchants (under Retler's lead) were
not actually allied with, but did work towards a common goal with Doctor Zero -- and Gordon & Lenore Castle, Michael Devlin, Gregor Gerasimov, Victor Guillermos, John Nighthunter, Dirk Ravenscore, and Ripley
Weaver-- against Dr. Henry Clerk and his group of Merchants (including the Gray Man)
Enemies: Dr. Henry Clerk and his loyal Merchants (including the Gray Man (Frederick Gramon), O'Neill and the other unidentified subway strike team members; Al + 1, Bob & Tony + driver, Jack + 1, Rog + 1, numerous unidentified others), Doctor Zero, Murray, Sandinistas, others unspecified;
Clerk's Merchants were enemies of the people of Ft.
St. Vrean (including Cindy, Ray, and Mrs. Martin), as well as Gordon & Lenore Castle, Michael Devlin, Gregor Gerasimov, Victor Guillermos, John Nighthunter, Dirk Ravenscore, and Ripley
Weaver
Base of Operations: Unrevealed;
formerly numerous, including:
Ranier Mesa (presumably Nevada, USA);
Mount Weather, aka the "Special Facility" (presumably Virginia, USA);
Hughes Glomar Explorer;
US Naval SSBN Leviathan;
an unspecified military aircraft, sometimes based in unspecified desert;
a few places with no name; built with tax dollars that never
reached the IRS, these citadels of post apocalypse democracy lied
buried under desserts...hidden in hillsides...sunken deep beneath lake
waters; known only to a select few, they'd be lost forever if anything
happened to the handful of people who knew about them; they'd become
forgotten tombs, as cold and barren and lifeless as everything they
really represented; no matter for far they had to push it, they would
ensure there was at least one island of the American way of life left
somewhere...
Reality-88194
First Appearance: (Henry Clerk) Doctor Zero#2 (June,
1988);
(Merchants identified and seen) Doctor Zero#5 (December, 1988)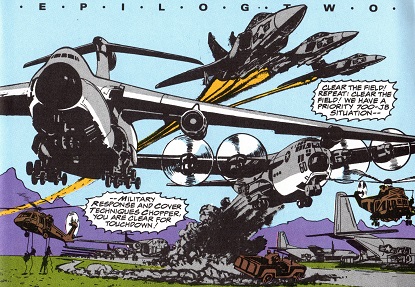
Abilities: A covert US government military and espionage group protect the United States of
America from any threat, by any means, the Merchants excelled in tactical assessment and rapid deployment.
To help maintain their covert nature, they discouraged insignia. They were successful at not being known.
Most of the Merchants were highly experienced in various forms of armed and unarmed combat, as well as covert operations, espionage, etc.
See the individual profiles and
various sub-profiles for specific abilities of individual members
and/or sub-groups.
History:
(Doctor Zero#5 (fb) - BTS) - The Military Response and Covert Techniques Squadron were allegedly one of the groups established by the Department of Defense right after "Desert One" (the staging base used in the failed 1980 Operation Eagle Claw, an aborted mission intended to rescue US hostages from Iran).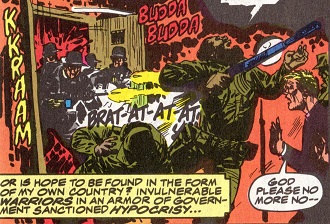 (St.
George#7 (fb)) - In Nicaragua, the MRCTS attacked and slew Sandinistas
who had captured missionary Reverend Michael Devlin (who had been
helping local villagers). One of the Merchants introduced themselves as
MRCTS, but another whispered hastily, "No, tell him CIA!"
(St.
George#7 (fb)) - In Nicaragua, the MRCTS attacked and slew Sandinistas
who had captured missionary Reverend Michael Devlin (who had been
helping local villagers). One of the Merchants introduced themselves as
MRCTS, but another whispered hastily, "No, tell him CIA!"
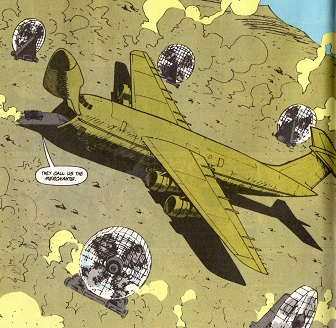
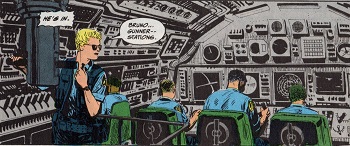
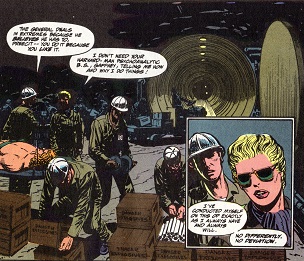
(Doctor Zero#5) - Preecit
brought Gaffney into the sandstorm-hidden aircraft. As Retler explained
to a group of Merchants the nature of the Powerline
superhumans, he introduced himself and explained the Merchants' mandate
to the arriving Gaffney. Retler then elaborated on what the Merchants
saw
as the real threats, such as Doctor Zero, naming him as responsible for
the loss of MRCTS' Henry Clerk, US Navy submarine Captain Paul
Obsitnik, and the Arctic weapons site the Toy Factory. Retler also
identified Zero as having ties to the Soviet government, and described
Zero's dangerous power, which the Merchants intended to understand and
possess. 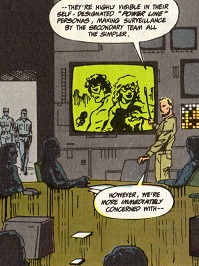
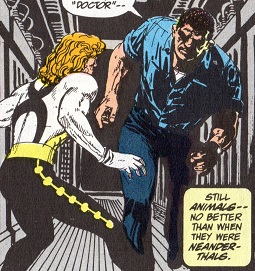
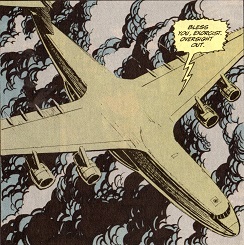
(Doctor Zero#6) - Agent Exorcist warned a commercial airliner away from restricted Merchants airspace. Exorcist then informed Oversight that they were clear.
Retler considered that they had become Oversight, an organization lost among a mass of bureaucratic paperwork; he determined that being overlooked and secretly preserving the USA made them good, pure, and right.
Major Preecit
informed Retler that the commercial
flight crew had already been slated for sanction by their ground units. 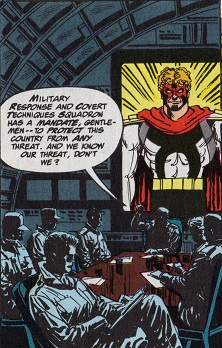
Retler soon reported at the briefing that Zero was perhaps weaker than previously estimated. They then discussed the means by which they would take possession of Zero's power; they considered how Zero attempted to stabilize worldwide tension points and ecological issues. After discussing another carbon dioxide release or nerve gas accident, or defoliating a rain forest (which another agent noted they were saving for the future), Preecit advised that they needed to have a localized and contained environment they could control: Taking over a submarine.
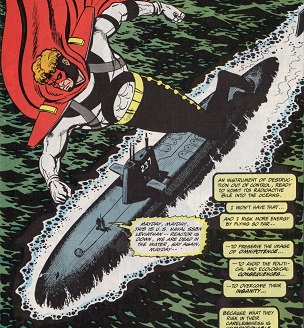
(Doctor Zero#6 (fb) - BTS) - The Merchants took over US Naval SSBN Leviathan (a nuclear-powered submarine) and then sent out a mayday that their reactor was down and that they were dead in the water.
Doctor Zero heard the report and traveled to the submarine to avert further ecological damage.
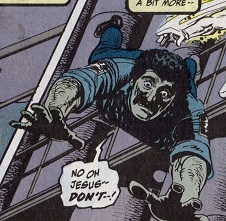
(Doctor Zero#6) - The hidden Merchants sealed and dove the submarine soon after Zero entered it. As Merchant agents drew their guns, Zero detected the ambush and slew the men with his vacuum effect. Gaffney subsequently realized that Zero was manipulating the active sonar and told everyone to cover their ears as Zero transmitted an extremely loud noise. Preecit then sent the large Bruno to physically confront Zero, forcing him to further exhaust his energies against Bruno and the discharge of some batteries into which Zero and Bruno had collided.
Down in the missile bay, Gunner nailed Zero with a tranquilizer dart, forcing Zero to use more energy to counteract its effects and to take down Gunner, although he drained Gunner's energies to restore his own. Zero then caused a dozen or two killer whales to collide into the sub, and the force of the collision blew off the safety tank, causing the submarine to surface. Preecit then flooded the negative buoyancy tanks, causing an emergency dive and then shooting the equipment that could reverse that.
As Gaffney exited the top of the submarine and Preecit followed, Zero confronted Preecit, who caught him unprepared and shot him in the side. As Zero dug the bullet out of his side, Preecit located Gaffney on the surface and met up with a Merchants helicopter.
Virtually exhausted of energy, Zero wrapped himself in mattresses and entered an unconscious state to recharge his energies as the submarine dove and was crushed.
Aboard the Hughes Glomar Explorer, Retler and Preecit supervised the recovery of the submarine fragments. Retler praised Preecit and Gaffney, and Preecit noted that their losses had been within acceptable levels. Retler explained to Gaffney how the recovery device had been nicknamed Clementine (as it worked in a cavern, in a canyon...like the miner and his daughter, Clementine, from the song).
After Gaffney confirmed Zero's survival, Retler assured Gaffney that they were in control now.
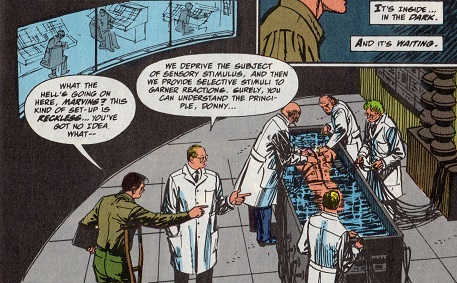
(Doctor
Zero#7 (fb) - BTS) - Zero was kept in a sensory deprivation tank at
Mount Weather, a hollowed out mountain fortress the US government put
together in the 1950s to act as an alternate capital, a place for the
government to relocate if needed. Zero was subjected to selective
stimuli to garner reactions under the direction of Dr.(?) Marvins.
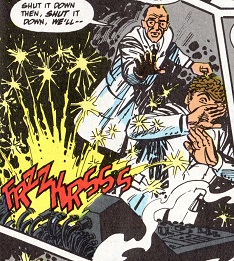
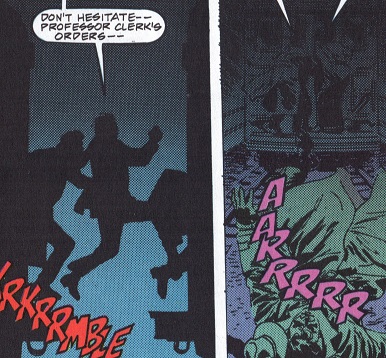
(Doctor Zero#7) - Despite Gaffney's warning of disregarding safety by trying for quick results, Marvins continued his efforts, noting this was exactly how Retler preferred it. Gaffney informed Retler, and they and Preecit rushed to stop Marvin.
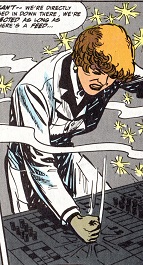
Meanwhile, Marvins initiated an electrical stimulation (0.3 volts) of Zero, and his assistant noted that they were getting feedback. As this was barely any stimulation, Marvins felt something was wrong and ordered the stimulation to be shut down, but his assistant noted that she couldn't shut it down as they were directly plugged in and they were connected as long as there was a feed.
(Doctor Zero#7 - BTS) - Marvins, his assistant, and others were killed by the feedback, leaving only their skeletons and burnt out equipment.
(Doctor Zero#7) - As the alarms sounded, Retler, Preecit, and Gaffney rushed down to find the corpses of Marvins and his staff. Preecit then had Zero sedated.
Gaffney subsequently noted and reported that
tensions were running high as people feared what had happened with
Marvins.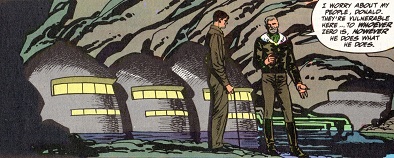
(Doctor Zero#7
(fb) - BTS) - The MRCTS took over
the operation of the Rainier Mesa Facility and Retler had Zero transferred there.
(Doctor Zero#7 (fb) - BTS) - In the next six weeks at Ranier, the Merchants worked with minimal sleep and food in desperation to succeed; they lived off of coffee and sugar, and perhaps whatever super-spy stamina training they'd picked up in Merchants' school. Nonetheless, they became progressively fatigued.
(Doctor Zero#7 (fb) - BTS) - Zero began subconsciously influencing everyone at Ranier. He fused the connections on various pieces of equipment and re-routed the readings to show the Merchants what they wanted to see. Meanwhile he progressively absorbed the energy he needed to revive.
Zero was kept in what they called the "Zero Room," a cavern at the edge of a tunnel with blast doors that could protect them from nuclear explosions. The big metal doors were welded shut, with everything beyond sucked dry of air and turned into a vacuum. The tunnel was known as the "N" Tunnel, 875 feet of instruments set in steel to test the impact of radiation from a nuclear weapon on military equipment. Warheads were set off in a cavern at the far end of the tunnel, with radiation traveling down the pipe at the speed of light, followed closely by the shockwave. Within 16 milliseconds, the blast doors exploded shut, trapping the shockwave in the cavern.
Gaffney realized that Zero was affecting everyone. He rushed down to Zero, opened the pipe, and tried to get him to leave, to no response.
(Doctor Zero#7 (fb) - BTS) - Retler collapsed from exhaustion.
(Doctor Zero#7) - Taking command, Preecit arranged to have Retler flown out to a specialist for treatment. She then initated plans to simulate the force of a low yield nuclear weapon with C4 and TNT to test Zero.
Gaffney discovered that Zero had fused the connectors and re-routed the readings to show the Merchants what they wanted to see.
Realizing that everyone was in danger from Zero, Gaffney struck one of the Military Police, took his gun, and fired into the air to get everyone to flee. Preecit nonetheless conducted the test, but 16.5 milliseconds after the explosion, the blast doors vanished as Zero unleashed his vacuum effect. The Merchants at the end of the "N" Tunnel barely had time to feel their bodies torn and twisted by the concussion.
As
Zero took out everyone in his path, Preecit threw another agent in
front of her, and she fled as Zero destroyed him. Zero healed Gaffney's
leg (injured in the submarine confrontation) before catching up to
Preecit, fleeing in a RAF harrier, and caused her to fall to her death.
(Critical Mass#1 (fb) - BTS) - Retler apparently suffered permanent damage to his left arm at Zero's hands.
(Critical Mass#1) - At an unnamed military base, Gaffney prepared things for a meeting between Retler and other government agents.
(Critical Mass#1) - Meeting with a number of bureaucrats -- including the Secretary of..., director of (the CIA?), and the vice-President (Dan Quayle) -- Retler and Gaffney warned that Zero and other shadows, such as the Powerline youths, were a threat to them.
(Critical Mass#1 - BTS) - Dirk Ravenscore restored (and possibly enhanced) Henry Clerk's intelligence, and Clerk plotted anew to cause the world's nuclear power plants to meltdown so he could monitor radiation's progressive effects on humanity.
(Critical Mass#2) - Clerk contacted General Retler, informing him that he was still alive.
(Critical Mass#2/2) - Gaffney met with Clerk at the Pentagon, using fingerprints, blood tests, and retinal scans to confirm his identity.
(Critical Mass#2/2) - At the Pentagon, Retler and Gaffney met with Clerk, who discussed his plans to link all of the United States nuclear power sites via a grid that would enable the achievement of a safe, inexpensive, and virtually unlimited power source. In reality, the grid was to be a system of interlocking detonators waiting to be triggered by a massive discharge of radiation.
Retler agreed to Clerk's proposals, after which Clerk sent his agent Gramon to being murdering the other most intelligent nuclear physicists on the planet who might discover Clerk's true plans.
(Critical
Mass#2/2 - BTS) - Influenced by the MRCTS, an unidentified inspector
ruled Smyth's death as suicide, ignoring evidence of his murder.
Investigating, Dr. Zero forced the inspector to reveal his orders had
come from the government.
(Critical Mass#2/2 - BTS) - Working together, Russian agent Gregor Gerasimov and Dr. Zero investigated the Gray Man. While Zero rescued Gramon's victim, Gregor confronted Gramon, beating him down, but then falling victim to a dagger slash to his throat. Zero healed Gregor, but was forced to allow Gramon to escape in the process.
(Critical Mass#3) - Clerk called an emergency meeting of the MERCHANTS at a "Celebration of Chili" festival. He assured Retler and Gaffney of America's near-future energy self-reliance, but used his previous lies regarding Zero to convince the group that Zero was the greatest threat on the face of the planet. Gaffney asked why Clerk had to have a dozen men killed rather than simply locking them up, but Clerk argued that he was just stopping those who would oppose America's independence.
Though Retler refused to put his men at risk again via direct conflict with Zero, Clerk convinced him to coordinate the areas of greatest potential effect on Zero, so they could distract and otherwise occupy him to prevent Zero from discovering his recovery.
Clerk had Gramon and Merchants under his command investigate and
ultimately identify the oceanographer associated with Zero as Sheila
Willis.
(Critical Mass#3 - BTS) - To save his life, Dirk Ravenscore told the Powerline shadow partners (Lenore Castle & Victor Guillermos) and their ally, fellow shadow Ripley Weaver, of Clerk's plans.
(Critical Mass#4) - Clerk initiated the process of secretly disabling the sensors that would otherwise alert the staff of the elevating levels of radiation leakage he would need to institute his plan.
(Critical Mass#4/interlude (fb) - BTS) - Alongside a Merchants crew (perhaps including Gramon), Clerk visited "Nixon's Pyramid" -- a billion dollar anti-ballistic missile facility designed to detect and take out Soviet nuclear missiles, which President Nixon had negotiated to deactivate -- and took most of the sensors, allegedly including some of the ones that didn't work. Clerk told the base's commanding officer (?) they were to going to repair the sensors.
(Critical Mass#4/interlude) - Retler and Gaffney
investigated Nixon's pyramid; upon learning of Clerk's actions, Retler
instructed Gaffney to find out what Clerk was really up to, and Retler
vowed to do whatever was needed to stop him if that proved necessary.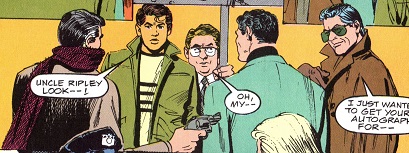
(Critical Mass#4/2 - BTS) - Ripley Weaver and Victor
Guillermos, via a meeting arranged by Ripley's civil servant ally (and
fellow shadow) Murray, told General Johnny Getzer what they had
learned about Clerk.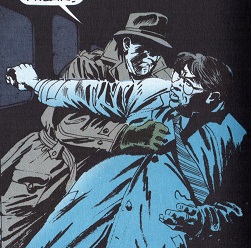
(Critical Mass#4/2) - General
Getzer then contacted Retler aboard his ship. After engaging their
scrambler, a secure Merchants comm-link was activated, and Getzer
informed him of this encounter.
Retler then instructed a lieutenant to get him all of the information they had on "these Powerline brats."
Wishing to clean his own house, Retler also considered that the power and prestige of Castle and Guillermos might be of use in taking down Doctor Zero.
(Critical Mass#4/2) - Intercepting
the transmission between Generals Getzer and Retler, Clerk considered
that as long as he remained ignorant of the true nature of his
experiment, Retler remained a useful source of information.
Impressed with "this Powerline contingent" as an unwanted tangent in their flowchart, Clerk instructed Gramon to "delete them from the equation."
(Critical
Mass#4/2) - Gramon and a number of Merchants ambushed Victor
Guillermos, Ripley Weaver, and Murray in a Manhattan subway just after
they got on at 42nd street; one of them made the introduction,
distracting Weaver by asking him if he wasn't "Ripper? The wrestler?"
after which Gramon put a gun to Weaver's back.
Another Merchant then
slew subway engineer/driver/motorman Jerry and took control of the
train (re-routing it) before reporting that they were a go.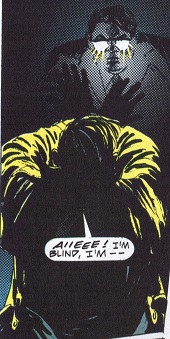
Weaver knocked away Gramon's gun hand and pushed him back, after which
Guillermos created a force field to block their attackers' bullets.
Guillermos' field weakened without being linked with Castle's power,
it subsequently shorted out the electrical systems, causing a
blackout.
When Murray projected light to help Guillermos and Weaver escape, one of the Merchants grabbed Murray, but Murray increased his light's intensity to blind his attacker, then sent Guillermos and Weaver into the next car, after which he used lasers to sever the connection between cars.
Ignoring "the fat one" (Murray) as the other two were the primary
targets, a trio of Merchants jumped between the separating cars to
follow them, although O'Neill didn't make the jump and fell painfully
(and perhaps fatally).
The two other Merchants tackled the fleeing
Guillermos and Weaver, but these two fought off the Merchants and then took
them out with an electrified chain and one of the Merchants' guns,
respectively.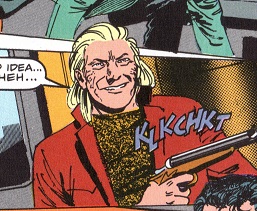
Gramon and at least another pair of Merchants pursued Weaver and Guillermos,
whose field buckled under the continued gunfire.
When the Merchant who had slain the driver confronted them at gunpoint, Weaver and Guillermos kicked out and dove out a window, with Guillermos' field proving strong enough to protect them from the impact of landing in water far below the bridge to which they had been re-routed.
Appreciating the connections and influence of their foes, Weaver convinced Guillermos they needed to ally with Doctor Zero to stop Clerk.
(Critical Mass#5/2 - BTS) - The KGB asked Gregor Gerasimov to look into the USA's new nuclear energy program.
(Critical Mass#5/2 - BTS) - Gerasimov
met with Dr. Zero, telling him about limitations in the investigations
of the murders and how the UK's authorities were just being manipulated
by the Merchants.
Gregor departed for the US via Russian submarine, while Zero noted that his own leads would soon bring him there, also.
(Critical Mass#5/2) - Clerk chose the Idaho Falls SL-1 reactor facility, which had already had a number of minor leakages and failures as the site from which to initiate his plan. Clerk had Gramon brainwash one of the night staff, trainee Richard Delming, and led him to slay his co-workers and pull the control rods from the reactor, leading to a nuclear explosion.
Later still, Clerk and Gramon ambushed Sheila Willis, the girlfriend of Dr. Zero, presumably planning to kidnap her to prevent Zero's interference. However, she fought back furiously, and Clerk beat her to death.
(Critical Mass#5/2 - BTS) - Zero found Clerk's Stop n' Stuff button beside Sheila's dead body, which drove him into a mad quest for vengeance, not just against Clerk, but first against the Order of Saint George that had plagued him over his life.
(Critical Mass#6 - BTS) - Michael Devlin subdued Zero and convinced him to join forces with himself, Powerline, Ripley Weaver, John Nighthunter, Gordon Castle, and John Neushuk against Clerk.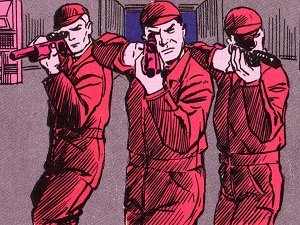
(Critical Mass#6: Epilogue One) <1345 hours> - At Colorado's Ft. Vrean nuclear plant, Clerk spoke with and distracted security officer Fodor, who greatly appreciated what Clerk had done for the industry, as Gramon sneaked up behind Fodor and broke his neck.
Knowing the monitors were limited and spread out over more areas than the three licensed operators -- Harwin, Jack, and Wally -- could monitor and manage, Clerk drained the reactor's coolant, ultimately causing a meltdown. As Wally telephoned to report a class nine emergency, one of the Merchants cut the phone line, after which another trio of Merchants confronted and fatally shot Harwin, Jack, and Wally.
Clerk then instructed Gramon to take the Merchants and secure the town to ensure no outside interference while he supervised the remainder of the experiment(Critical
Mass#6: Epilogue Two) - As Retler scrambled Merchant troops, Gaffney
reported that they had pulled every available satellite off their
normal stations and put them on the reactor sites. Gaffney then
explained how Clerk had pulled a reactor out of the power grid and that
Clerk's Merchant troops were active in the town.
Via apparent presidential order, Retler usurped control of General Johnny Getzer's military base, telling him they were going to war.
(Critical Mass#7 (fb)) <1422 hours> - Retler's Merchant troops entered Ft. St. Vrean with the objective of retaking the town and the reactor; they blacked out media coverage.
(Critical
Mass#7) - Apparently aboard their jet, as Gaffney reported the activities in Ft. St. Vrean, Retler
advised that they refer to it only as a war zone. Retler further
advised everyone present that they were not only responsible for their
sections but also for keeping a watch out for Dr. Zero and preventing
his interference.
After the others headed
out, Zero, who had replaced
one the Merchants, locked the door, trapping Retler and
Gaffney in with him. Incapacitating Retler, Zero called in his debt
from healing Gaffney, pressuring him to reveal the limited information
the Merchants had on Clerk's efforts and plans.
(Critical Mass#7 (fb) - BTS) - Gaffney told Retler how a single reactor's containment breach would lead to 6 million square miles contaminated, with 133,000 dead from exposure, and an additional 181,000 experiencing increased probability of cancers in 10 years, with property damage at 17 billion; and Clerk wanted to see this happen at upwards of 72 reactors, one after another.
(Critical
Mass#7) - In
Ft. St. Vrean, Clerk reviewed his theory that the core structure would melt down
under the heat, regrouping into a new mass at the bottom of the core,
which would reassemble into a supercritical configuration and
destructive nuclear excursion. Though releasing less than a kiloton of
force, it would be sufficent to breach the containment structure and
release the radioactive fission material; this radiation would be
sufficient to trigger the sensors installed at all the US commercial
reactors, and these sensors would activate similar excursions along the
network.
(Critical Mass#7 (fb) - BTS) - Gordon & Lenore Castle, Michael Devlin, Doctor Zero, Gregor Gerasimov, Victor Guillermos, Nighthunter, and Ripley Weaver flew a helicopter into Ft. St. Vrean.
(Critical
Mass#7/2) - Merchants jammed transmission of videos of the facility and
Dr. Zero's approach taken by Adam Neushuk's cameraman. One of the
Merchants asked Retler if he wanted to blow Neushuk's helicopter out of
the sky, but Retler replied, "Not yet."
When Gaffney brought up the encounter with Zero, Retler told Gaffney if
he wanted to redeem himself, he should help take down Zero for good.
Gaffney argued that Zero was a hero, but Retler argued that the public
just wanted a hero, and that -- if the public survived the day -- they
were going to use every trick they had to give the public two new
heroes...
(Critical
Mass#7) - As
Clerk's Merchants patrolled the city, firing on any citizens they
encountered and had firefights with Retler's Merchants, Zero flew into
the city, obliterating the hostile soldiers he encountered before
flying into the reactor. 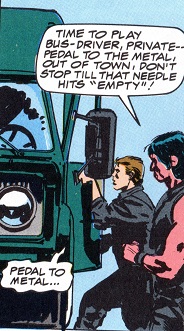
(Critical Mass#7/3) - Michael Devlin located Clerk's Merchants rounding up innocent people and overpowered the oppressors. Encountering schoolteacher Ray Marlin, he learned of and then freed his daughter, Cindy, and wife, who were being held as a hostage by Merchants including Bob and Tony.
Devlin then had Nighthunter use his mind-controlling bone implants to force a Merchant private to drive a truck full of innocent people out of the town and as far away as possible.
 At the municipal building, which Clerk's Merchants had taken over,
Gramon passed on the written order to execute all of the prisoners in
order to preven their interference with Clerk's experiment.
Readily accepting this order, one of the Merchants asked his friend, Rog,
if they got finished early if he wanted to go bowling. As the Merchants
raised their weapons, Devlin fired an energy blast that knocked the
Merchants back and set the prisoners free.
At the municipal building, which Clerk's Merchants had taken over,
Gramon passed on the written order to execute all of the prisoners in
order to preven their interference with Clerk's experiment.
Readily accepting this order, one of the Merchants asked his friend, Rog,
if they got finished early if he wanted to go bowling. As the Merchants
raised their weapons, Devlin fired an energy blast that knocked the
Merchants back and set the prisoners free.
As Devlin approached Gramon, recognizing him as the head of the serpent and intending to stop him from rallying the Merchants against the townspeople, Gregor asked Devlin to enter the reactor to check on Zero, who had been in there too long.
Gerasimov defeated Gramon.
(Critical Mass#7/3 - BTS) - Gregor presumably slew Gramon before fleeing back to the helicopter.
(Critical
Mass#7) - Clerk shrewdly injured Zero and -- to prevent Zero from somehow calming the nuclear material --
reactivated and overloaded the steam turbines, generating sufficient
torque to cause a turbine to tear loose and impact and shatter the
containment structure. Despite the events happening around them, the
nearly powerless Zero battled Clerk furiously, until Michael Devlin
took both men out and hauled them out of the reactor and into the
helicopter.
As the reactor released its
radiation, however, the recovered Zero tackled Clerk out of the
helicopter and threw him back into the reactor; Clerk was apparently
consumed in the explosion, although Gordon Castle -- whose powers were
amplified by Dirk Ravenscore via energies channeled by Lenore and
Victor -- transported the reactor and surrounding land into space,
preventing the other reactors from sensing the radiation and following
Clerk's plan.
(Critical
Mass#7/3) - Retler advised that they would finish their study and then the corps of
engineers could rebuild if that was what was decided.
(Critical Mass#7/2) - Retler subsequently had Gaffney leak information on Lenore Castle and Victor Guillermos, setting them up as the public's new heroes.
Comments: Created by D.G. Chichester, Margaret Clark, Brett Ewins, and Steve Dillon.
I know Military Response and Covert Techniques Squadron does not spell MERCHANTS. I think it is more a sound...MR-CTS...Murr--Sits...sort of...I don't know...I didn't write it.
I had the Merchants as appearing in St. George#6, but I don't see them in there. Henry Clerk was there, so maybe that's why I had them listed...
Profile by Snood.
CLARIFICATIONS:
The Merchants have no known connections to:
A1 and his military partner were members of Henry Clerk's group of Merchants who took over Fort St. Vrean.
(Critical Mass#7/3 (fb) - BTS)
- John Nighthunter began nailing a number of Clerk's Merchants with
bone chips that allowed him to control them. Nighthunter then directed
those Merchants to use their equipment to get Ft. St. Vrean's residents
out of the town.
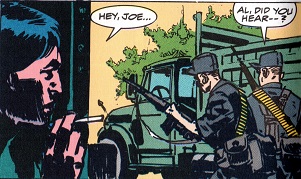
(Critical Mass#7/3) - As Al and
his partner were patrolling the city, John Nighthunter -- armed with
his blowgun and preparing to fire the bone chips that would allow him
to control the men, with called out "Hey, Joe..." from behind a
vehicle. The other Merchant asked Joe if he had heard something...
--Critical Mass#7/3
Note: It is
ASSumed that Al and his partner fell victim to Nighthunter's control,
meaning they helped evacuate the town's residents, which also means
they would have been out of town when Gordon Castle transported the
city into space.
Nighthunter said, "Hey, Joe" to distract Al and his partner. I don't think there's any reason Nighthunter would have known the Merchants' names, so presumably he was either using Joe as a nickname for a soldier, as in "G.I. Joe." or he was making a reference to the Jimi Hendrix song, "Hey, Joe."
Nighthunter provided instructions to many he had enslaved as, "Time to play bus-driver...pedal to the metal, out of town, don't stop till that needle hits empty!"
Bob & Tony and their driver were members of Henry Clerk's group of Merchants who took over Fort St. Vrean.
(Critical Mass#7/3 (fb) - BTS)
- Bob & Tony and their driver were among the Merchants instructed
to gather up the people of Ft. St. Vrean and bring them downtown to the
detention center.
(Critical Mass#7/3 (fb) - BTS) - Bob & Tony collected the wife and daughter (Cindy) of Ray Marlin, who subsequently provided that information for Michael Devlin; Ray then drove a jeep to allow Devlin to intercept Bob & Tony's vehicle.
Bob & Tony both rode in back,
with the unidentified Merchant driving. As Cindy was hysterical, one of
the Merchants warned her mother to keep the girl quiet.
(Critical Mass#7/3)
- As one of the Merchants began to discuss Gramon's plans, Cindy
screamed for her mother, and the other Merchant reminded her mother of
his instruction to keep the girl quiet.
As Devlin and Ray's jeep
approached, Cindy screamed aloud her excitement at being rescued by a
heroic knight, and the Merchants spotted Devlin just before he leapt
into the back of their transport.
Devlin knocked Tony and then Bob
out of the back of the transport, then climbed around to the front of
the vehicle.
The driver stopped abruptly,
knocking Devlin off balance, and he escaped the vehicle before Devlin
could punch through the windshield.
The driver then circled around to
the back of the vehicle, pulled Cindy from her mother's arms, and held
her at gunpoint to try to force Devlin to back off.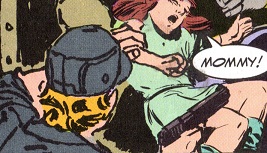
Devlin, however, fired a blast that incapacitated the driver without harming Cindy.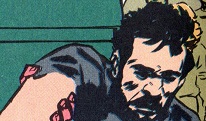
Devlin subsequently had John Nighthunter nail a number of Clerk's Merchants with
bone chips that allowed him to control them.
Nighthunter certainly nailed Bob, Tony, or the driver (presumably Bob, as he had dark hair and a beard)
(Critical Mass#7/3 - BTS) - Nighthunter presumably nailed the other two (presumably Tony and the driver) and then directed those Merchants to use their equipment to get Ft. St. Vrean's residents out of the town.
(Critical Mass#7/3 - BTS) - Nighthunter provided instructions to many he had enslaved as, "Time to play bus-driver...pedal to the metal, out of town, don't stop till that needle hits empty!"
--Critical Mass#7/3
Note: It is ASSumed that Al and his partner fell victim to Nighthunter's control, meaning they helped evacuate the town's residents, which also means they would have been out of town when Gordon Castle transported the city into space.
Tony has blond hair.
The driver has more orange (strawberry blond?) hair.
By process of elimination, Bob is apparently the one with dark hair and a beard.
Bruno was part of the team of Merchants who took over the US Naval SSBN Leviathan (a nuclear-powered submarine) under the leadership of Major Preecit.
They then sent out a mayday that their reactor was down and that they were dead in the water, with the goal of attracting and capturing the powerful shadow Doctor Zero.
He was a large, muscular man, perhaps 6'7" or taller.
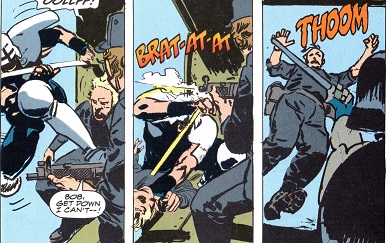
(Doctor Zero#6) - When Doctor Zero entered the submarine, Preecit ordered Bruno and Gunner to their stations
After Zero had begun to retaliate against attacks,
Preecit sent the large and strong Bruno to physically engage Zero while Gunner took position above.
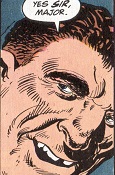
Bruno smiled as he announced his
compliance with orders, and then confronted Zero, taunting the "doctor"
to try something. The superhumanly powerful Zero swiftly took the wind
out of Bruno's sails with a single punch to the abdomen.
As Zero's next strike took them
towards the ship's batteries, the stunned Bruno tried to warn Zero of
the danger, but he only had time to glance at the batteries before the
collision apparently electrocuted him.
Still far below his full power level following
his encounter with Dr. Henry Clerk, Zero survived and climbed back to
his feet, but he appreciated that the assault had drained him enough to
make each step of this process harder and longer.
--Doctor Zero#6
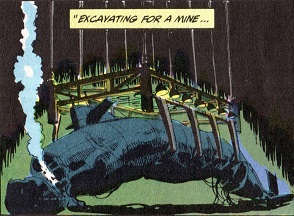
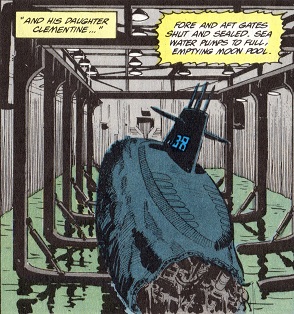
A deep sea retrieval device extended from grappling hooks from the bottom of the Hughes Glomar Explorer.
It was nicknamed Clementine as it worked in a cavern, in a canyon...like the
miner and his daughter, Clementine, from the traditional song "Oh my darling Clementine."
(Doctor Zero#6) - After the Leviathan submarine had sunk and collapsed around the weakened shadow known as Dr. Zero, other Merchants (led by General Franklin Retler) arrived aboard the Hughes Glomar Explorer to rescue survivors (Donald Gaffney and Major Preecit) and to recover the Leviathan remnants and Zero.
Retler and Preecit supervised as
Clementine recovered the remnants of the crushed submarine, and within
them, the inert Zero, allowing the Merchants to take possession of him.
Retler explained to Gaffney how the recovery device had been nicknamed Clementine from the song.
--Doctor Zero#6
Note: You can search for the lyrics (and the song, if
you need to here it), but here's the general bits you'd need to
recognize it if the name itself isn't enough...
"In a
cavern, in a canyon
Excavating for a mine
Dwelt a miner, forty-niner
And his daughter, Clementine
Oh my darling, oh my
darling
Oh my darling, Clementine
You are lost and gone
forever
Dreadful sorry, Clementine"
(Doctor Zero#6) - Agent Exorcist warned a commercial airliner away from restricted Merchants airspace. Exorcist then informed Oversight that they were clear.
(Doctor Zero#6) - The commercial flight crew was slated for sanction by the Merchants' ground units.
--Doctor Zero#6
Note:
Exorcist was presumably the pilot of the Merchant ship. I don't think
we ever learned this person's identity. I don't think it was Preecit or
Retler.
I'm not quite sure why this person
had the name "exorcist." Maybe it was because he/she could scare the
devil out of others?
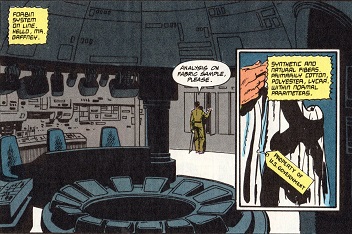
Within the Mount Weather facility (aka the "Special Facility") used
by the Merchants, the Forbin system was an artificial intelligence
system programmed with voice command and response. It could sense the
presence of others, identify them, and confirm or deny them access to
its faculties. It could analyze and report on materials.
(Doctor Zero#7) - When Donald Gaffney entered its chambers, the Forbin system came online, identified him, and greeted him.
Gaffney had the system analyze Dr. Zero's costume, which it noted to be synthetic and natural fibers, primarily cotton, polyester, and lycra; it assessed the material as within normal parameters.
Seeking to learn Zero's nature, Gaffney asked the
Forbin system what else they had, and it activated the Hudson Holographic Image Processor, showing visual images as it detailed his
abilities, including flight, vacuum effect producing soundless
explosion; it also noted that the media considered him a hero.
The Forbin system continued, noting that his
appearances coincided with natural and man-made disasters and that his
actions were instrumental in resolving these situations. Noting other
appearances suggesting alternative covert purposes, it showed black box
video of Zero's assault on the Toy Factory and Henry Clerk. It further
noted that Zero's capture via the Leviathan was in part due to Zero
having been weakened by the
Toy Factory explosion.
The Forbin system also assisted Gaffney in
analyzing Zero's body structure, allowing him to note how Zero's muscle
tissue was tighter than it should be given his nearly human cell
structure; his reflexes were projected to be off the scale.
then studied Zero's costume and reports on his powers and activities before meeting with Retler, who thanked him for his hard work.
--Doctor Zero#7
Note: It
seems likely that the Forbin system was named for the the Forbin
Project from the 1970 science fiction movie Colossus: The Forbin
Project (based on the 1966 novel The Colossus), in which an American
defense system becomes sentient, links with a similar Soviet system and
eventually takes over the world.
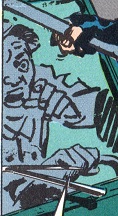
Gunner (real name unrevealed; see note) was part of the team of Merchants who took over the US Naval SSBN Leviathan (a nuclear-powered submarine) under the leadership of Major Preecit.
They then sent out a mayday that their reactor was down and that they were dead in the water, with the goal of attracting and capturing the powerful shadow Doctor Zero.
Gunner was assigned to assault Zero to force him to use up his
power stores to facilitate his capture.
(Doctor Zero#6) - When Doctor Zero entered the submarine, Preecit ordered Bruno and Gunner to their stations
After Zero had begun to retaliate against attacks, Preecit sent the large and strong Bruno to physically engage Zero while Gunner took position above.
Down in the missile bay, Gunner nailed Zero with a tranquilizer dart,
forcing Zero to use more energy to counteract its effects; he then flew
up and hurled Gunner to the ground; at Zero's demands, Gunner revealed
the group involved to be the Merchants, after which Zero fatally
drained Gunner's energies to restore his
own.
--Doctor Zero#6
Note: Maybe Gunner was his real name?
Probably
not, but I have a good friend with the last name Buser...we would have
called him boozer even if his last name was Smith!
Gunner has no known connection to:
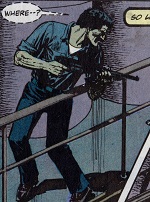
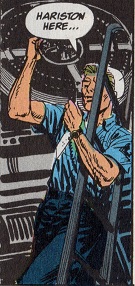
Hariston was on deck on the US Naval SSBN Leviathan as Dr. Zero arrived and as Milano took him down into the submarine.
Hariston then followed them, sealing the submarine and informing Major Preecit that Zero was in.
The Leviathan then submerged.
--Doctor Zero#6
Note: Hariston wasn't seen again, but I think only Preecit and Gaffney got out alive, so he presumably perished at some point.
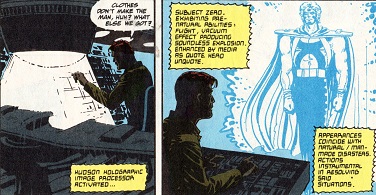 Hudson Holographic Image Processor
Within the Mount Weather facility (aka the "Special Facility") used
by the Merchants, the Forbin System artificial intelligence utilized
the Hudson Holographic Image Processor to project three-dimensional
images as a visual aid during analyses and discussions.
It can also project videos.
(Doctor Zero#7) - While evaluating/discussing the nature of Doctor Zero, the Forbin System activated the Hudson Holographic Image Processor to assist in its presentation.
The Processor included images of a
fully-costumed Zero and of his internal musculature, as well as videos
of the Toy Story and Leviathan encounters.
--Doctor Zero#7
Note: I don't
know if the association of the name Hudson with some sort of image
projection system has any real historical, cultural fictional
significance. An internet search got me two things: Jack and Squat.
If you know of any other significance, please let me know.
The Explorer was a ship that carried the device known as Clementine, which was designed to recover materials from the ocean's floor.
(Doctor Zero#6) - The
Hughes Glomar Explorer apparently transported General Franklin Retler
and other Merchants to rescue Preecit and Gaffney and to recover the
shadow Dr. Zero, who had sunk to the bottom of the ocean in the crushed
Leviathan submarine.
After Preecit and Gaffney had been recovered, Retler and Preecit supervised the
recovery of the submarine fragments.
The device known as "Clementine"
was released from the bottom of the ship, and it descended to the
bottom, retrieved the crushed Leviathan (which surrounded Zero), and
returned it to the Explorer.
--Doctor Zero#6
Note: Courtesy of Wikipedia:
The USNS Hughes Glomar
Explorer (aka GSF Explorer and T-AG-193) was a deep-sea drillship
platform initially built for the United States Central Intelligence
Agency Special Activities Division secret operation Project Azorian to
recover the sunken Soviet submarine K-129, lost in March, 1968.
The ship was built between 1971-1972 at great expense at the direction of Howard Hughes for use by his company, Global Marine Development, Inc. (hence the name "Glomar").
The ship recovered the sought submarine, a mechanical failure in the grapple caused 2/3 of the recovered section to break off during the recovery.
This lost section is said to have held many of the most sought items, including the code book and nuclear missiles. It was subsequently reported two nuclear-tipped torpedoes and some cryptographic machines were recovered, along with the bodies of six Soviet submariners, who were given a formal, filmed burial at sea.
You can Google it for more information...
Jack and his military partner were members of Henry Clerk's group of Merchants who took over Fort St. Vrean.
(Critical Mass#7/3 (fb) - BTS)
- John Nighthunter began nailing a number of Clerk's Merchants with
bone chips that allowed him to control them. Nighthunter then directed
those Merchants to use their equipment to get Ft. St. Vrean's residents
out of the town.
(Critical Mass#7/3) - As Jack and his partner were patrolling the city, John Nighthunter targeted them. Both Jack and his partner heard something -- presumably Nighthunter making a noise to draw them closer to them -- after which Nighthunter fired a pair of darts that nailed both Jack and his partner.
(Critical Mass#7/3 - BTS) - Nighthunter provided instructions to many he had enslaved as, "Time to play bus-driver...pedal to the metal, out of town, don't stop till that needle hits empty!"
(Critical Mass#7/3) - Soon after, Jack and his partner were mindlessly preparing to follow out their orders, voicing "pedal...metal..."
-- armed with
his blowgun and preparing to fire the bone chips that would allow him
to control the men, with called out "Hey, Joe..." from behind a
vehicle. The other Merchant asked Joe if he had heard something...
--Critical Mass#7/3
Note: It is ASSumed that Al and his partner fell victim to Nighthunter's control, meaning they helped evacuate the town's residents, which also means they would have been out of town when Gordon Castle transported the city into space.
--Critical Mass#7
(Doctor
Zero#5 (fb) -
BTS) - The Merchants established a base in an unspecified desert aboard
a large military aircraft, using five or more industrial fans (based on the spacing of
the ones we can see, I would think there would be closer to nine, assuming symmetric spacing)
to blow
up a seeming sandstorm to hide their location:
The silicon particles acted as a screen against heat tracking, radar, and especially satellite surveillance.
(Doctor Zero#5) - Major Preecit brought detached Navy officer Donald Gaffney into the sandstorm-hidden aircraft, having the fans deactivated as they approached so they could see and enter the ship.
(Doctor Zero#6) - Agent Exorcist warned a commercial airliner away from restricted Merchants airspace.
The airliner's pilot countered that the unidentified aircraft was on a restricted FAA frequency and that he had been flying this route for 15 years, so whoever was giving the orders could take his or her airspace and shove it.
As the Merchant ship came into
view, it's pilot offered to put a sidewinder missile right up the
backside of his 15 years, and the airliner's pilot quickly noted his
compliance, veering off and altering their flight path from the
restricted airspace.
Exorcist then informed Oversight that
they were clear.
In a meeting supervised by Retler and with Gaffney and many others present, Major Preecit convinced Retler that to use a submarine to capture the powerful shadow known as Doctor Zero.
(Critical Mass#4/2) - General
John Getzer then Retler aboard the Merchants jet. After engaging their
scrambler, a secure Merchants comm-link was activated, and Getzer
informed him of a meeting with Ripley Weaver and Victor
Guillermos, who had warned him of Clerk's dangerous activities performed by Clerk.
(Critical Mass#4/2 - BTS) - Intercepting the transmission between Generals Getzer and Retler, Clerk instructed Gramon to "delete <Powerline> from the equation."
(Critical Mass#6: Epilogue Two) - As Retler scrambled Merchant troops, Gaffney reported that they had pulled every available satellite off their normal stations and put them on the reactor sites. Gaffney then explained how Clerk had pulled a reactor out of the power grid and that Clerk's Merchant troops were active in the town.
(Critical
Mass#7) - Apparently aboard their jet, as Gaffney reported the activities in Ft. St. Vrean, Retler
advised that they refer to it only as a war zone. Retler further
advised everyone present that they were not only responsible for their
sections but also for keeping a watch out for Dr. Zero and preventing
his interference.
After the others headed
out, Zero, who had replaced
one the Merchants, locked the door, trapping Retler and
Gaffney in with him. Incapacitating Retler, Zero called in his debt
from healing Gaffney, pressuring him to reveal the limited information
the Merchants had on Clerk's efforts and plans.
(Critical
Mass#7 (fb) - BTS) - Gaffney told Retler the extent of Clerk's threat.
(Critical
Mass#7/2) - Aboard the jet, Merchants jammed transmission of videos of the facility and
Dr. Zero's approach taken by Adam Neushuk's cameraman. One of the
Merchants asked Retler if he wanted to blow Neushuk's helicopter out of
the sky, but Retler replied, "Not yet."
--Doctor Zero#5
Identified Merchants aboard Leviathan included Bruno, Donald Gaffney, Gunner, Hariston, Tony Milano, and Major Preecit (who ran the operations)
(Doctor
Zero#6 (fb) - BTS) - Knowing the shadow Dr. Zero would intervene to
prevent an ecological disaster (and seeking a situation with a
localized and contained environment), the Merchants took over US Naval
SSBN Leviathan (a
nuclear-powered submarine; see comments) and issued a mayday, noting
their reactor was down and that they were dead in the water.
(Doctor
Zero#6 (fb) - BTS) - Doctor Zero heard the report and traveled to the submarine.
(Doctor
Zero#6) - The hidden Merchants sealed and dove the submarine soon after Zero entered it. After
defending himself from attacks, Zero manipulated the active sonar;
detecting this, Gaffney told everyone to cover their ears as Zero
transmitted an extremely loud noise. 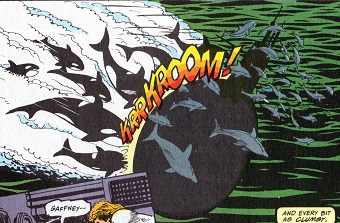
After enduring multiple other assaults, Zero caused a dozen or two killer whales to collide into the sub, and the force of the collision blew off the safety tank, causing the submarine to surface. Preecit then flooded the negative buoyancy tanks, causing an emergency dive and then shooting the equipment that could reverse that.
After Gaffney shot Zero and
escaped the submarine with Gaffney, the virtually exhausted Zero
wrapped himself in mattresses and
entered an unconscious state to recharge his energies as the submarine
dove and was crushed by the pressure at the ocean's depths.
Aboard the Hughes Glomar Explorerer, Retler and Preecit supervised the recovery of the submarine fragments.
--Doctor Zero#6
Note: SSBN stands for Ship, Submersible (aka a submarine), carrying Ballistic missiles, Nuclear-powered.
Zero noted 16 Trident C-4 missiles, each carrying eight 100 kiloton MIRV (multiple independently targetable reentry vehicle) warheads, in the Leviathan's missile bay.
The Leviathan submarine should be distinguished from:
Marvins was a research scientist in the Merchants. At the Mount Weather facility (aka the "Special Facility") used
by the Merchants, he was involved with studying the captured powerful shadow known as Doctor Zero.
(Doctor
Zero#7 (fb) - BTS) - At some point, General Franklin told "that son of
a bitch" (Marvins) if he tried any of his prima donna bull, he'd have
Marvins for breakfast.
(Doctor
Zero#7 (fb) - BTS) - Doctor Zero was kept in a sensory deprivation tank at
Mount Weather.
Under Dr.(?) Marvins' direction, Zero was deprived of sensory stimulus and then subjected to selective
stimuli to garner reactions under the direction of Dr.(?) Marvins.
(Doctor Zero#7) - Detached US Naval officer Donald Gaffney (who had allegedly been put in charge of the research on Zero by Retler) questioned Marvins, warning him of what he thought was a reckless setup where Zero was being held, and that he had no idea what-- (Marvins interrupted, but Gaffney was almost certainly trying to warn him of Zero's power/danger).
As Marvins explained what they were doing, Gaffney's
warned Marvins that he was disregarding safety by bypassing preliminary
trials and trying for quick results; undeterred, Marvins continued his
efforts, noting that General Retler was a man who appreciated quick
results.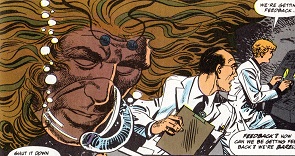 Marvins further
suggested Gaffney stop by the observation deck later so he could try to
explain to him.
Marvins further
suggested Gaffney stop by the observation deck later so he could try to
explain to him.
(Doctor Zero#7 - BTS) - Gaffney met with Preecit and Retler, the latter of whom was furious that Gaffney's instructions had been ignored. As they approached Mount Weather, he instructed Gaffney to pull the plug on Marvins before he got himself hurt.
(Doctor
Zero#7) - Meanwhile, Marvins initiated an electrical stimulation (0.3 volts) of
Zero, and his assistant noted that they were getting feedback. 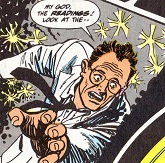
As this was barely any stimulation, Marvins felt something was wrong and ordered the stimulation to be shut down, but his assistant noted that she couldn't shut it down as they were directly plugged in and they were connected as long as there was a feed.
(Doctor Zero#7 - BTS) - Marvins, his assistant, and others were killed by the feedback, leaving only their skeletons and burnt out equipment.
(Doctor Zero#7) - As the alarms sounded, Retler, Preecit, and Gaffney rushed down to find the corpses of Marvins and his staff. Preecit then had Zero sedated.
Gaffney subsequently noted and reported that tensions were running high as people feared what had happened with Marvins.
--Doctor Zero#7
Marvins was a research scientist in the Merchants. At the Mount Weather facility (aka the "Special Facility") used by the Merchants, he was involved with studying the captured powerful shadow known as Doctor Zero.
(Doctor
Zero#7 (fb) - BTS) - Zero was kept in a sensory deprivation tank at
Mount Weather. Zero was subjected to selective
stimuli to garner reactions under the direction of Dr.(?) Marvins.
(Doctor
Zero#7) - Despite Gaffney's warning of
disregarding safety by trying for quick results, Marvins continued his
efforts, noting this was exactly how Retler preferred it.
(Doctor Zero#7 - BTS) - Gaffney informed Retler, and they and Preecit rushed to stop Marvin.
(Doctor
Zero#7) - Meanwhile, Marvins initiated an electrical stimulation (0.3 volts) of
Zero, and his assistant noted that they were getting feedback.
As this was barely any stimulation, Marvins felt something was wrong and ordered the stimulation to be shut down, but his assistant noted that she couldn't shut it down as they were directly plugged in and they were connected as long as there was a feed.
(Doctor Zero#7 - BTS) - Marvins, his assistant, and others were killed by the feedback, leaving only their skeletons and burnt out equipment.
(Doctor Zero#7) - As the alarms sounded, Retler, Preecit, and Gaffney rushed down to find the corpses of Marvins and his staff. Preecit then had Zero sedated.
Gaffney subsequently noted and reported that tensions were running high as people feared what had happened with Marvins.
--Doctor Zero#7
Milano greeted Dr. Zero as he
arrived on the surface of the Leviathan, noting himself to be the XO
(executive officer) of the submarine and welcoming Zero aboard (noting
he was expecting to get Soviet trawlers).
He told Zero there had been a reactor surge about the 3 hours ago, which had blown the ELF (Extremely Low Frequency, the communications program used by submarines) and main radio gear; and that the engineer was afraid the core might still go critical.
Explaining they were avoiding the
bridge as injured crewmen were stacked in the corridors on the way to
medical, Milano led Zero down into the submarine, after which it sealed
and submerged.
--Doctor Zero#6
Note: Milano wasn't seen again, but I think only Preecit and Gaffney got out alive, so he presumably perished at some point.
It wasn't confirmed, but Milano was presumably a Merchants agent posing as the Leviathan's XO.
Milano
may have been the real name of the actual XO, and the Merchant may have
been using the name falsely. The world may never know...
Mount Weather (aka the Special Facility) was a hollowed out mountain fortress the US government put together in the 1950s to act as an alternate capital, a place for the government to relocate in case of nuclear war or other national emergency.
It possesses its own internal roads and buildings as well as a man-made lake sparkling under fluorescent lights and "a computer that fills the eastern tunnel and make a Cray look like a Speak & Spell."
It had a laboratory facility with
a sensory deprivation tank and extensive testing equipment under the
direction of Dr. Marvins; the Forbin System artificial intelligence computer (equipped with a Hudson Holographic Image Processor)
(Doctor
Zero#7 (fb) - BTS) - After being captured by the Merchants, Zero was kept in a sensory deprivation tank at
Mount Weather. Zero was subjected to selective
stimuli to garner reactions under the direction of Dr.(?) Marvins.
(Doctor Zero#7) - Despite Gaffney's warning of disregarding safety by trying for quick results, Marvins continued his efforts, noting this was exactly how Retler preferred it. Gaffney informed Retler, and they and Preecit rushed to stop Marvin.
Meanwhile, Marvins initiated an electrical stimulation (0.3 volts) of Zero, and his assistant noted that they were getting feedback. As this was barely any stimulation, Marvins felt something was wrong and ordered the stimulation to be shut down, but his assistant noted that she couldn't shut it down as they were directly plugged in and they were connected as long as there was a feed.
(Doctor Zero#7 - BTS) - Marvins, his assistant, and others were killed by the feedback, leaving only their skeletons and burnt out equipment.
(Doctor Zero#7) - As the alarms sounded, Retler, Preecit, and Gaffney rushed down to find the corpses of Marvins and his staff. Preecit then had Zero sedated.
Gaffney subsequently noted and reported that tensions were running high as people feared what had happened with Marvins.
(Doctor Zero#7
(fb) - BTS) - The MRCTS took over
the operation of the Rainier Mesa Facility and Retler had Zero
transferred there, hoping a nuclear test facility would be able to hold
Zero in check.
--Doctor Zero#7
Note: According to Wikipedia: In the real world, the Mount Weather Emergency Operations Center is a civilian command facility in Virgina, used as the center of operations for the Federal Emergency Management Agency (FEMA). It is also known as the High Point Special Facility, and the preferred designation since 1991 is "SF." The facility is a major relocation site for the highest level of civilian and military officials in case of national disaster, playing a major role in continuity of government.
Rainier had wanted the lake
stocked with trout to give the men something to do if they were trapped
inside the facility; from Rainier's comments, it doesn't sound
like that was done.
Used in nuclear testing at Rainier Mesa,
the "N" tunnel had blast doors that could protect them from nuclear
explosions, which separated the tunnel from the Zero Room. The tunnel was known
as the "N" Tunnel, 875 feet of instruments set in steel to test the
impact of radiation from a nuclear weapon on military equipment.
Warheads were set off in a cavern at the far end of the tunnel, with
radiation traveling down the pipe at the speed of light, followed
closely by the shockwave. Within 16 milliseconds, the blast doors
exploded shut, trapping the shockwave in the cavern.
(Doctor Zero#7 (fb) - BTS) - The captured shadow known as Doctor Zero was kept in the "Zero Room."
Detached Naval officer Donald Gaffney realized that Zero was affecting everyone. He rushed down to Zero, opened the pipe, and tried to get him to leave, to no response.
(Doctor Zero#7 (fb) - BTS) - Retler collapsed from exhaustion.
(Doctor Zero#7) - Taking command, Major Preecit had Retler flown out to a specialist for treatment. She then initiated plans to simulate the force of a low yield nuclear weapon with C4 and TNT to test Zero.
Gaffney discovered that Zero had fused the connectors and re-routed the readings to show the Merchants what they wanted to see.
Realizing that everyone was in danger from Zero, Gaffney struck one of
the Military Police, took his gun, and fired into the air to get
everyone to flee.
Preecit nonetheless conducted the test, but 16.5
milliseconds after the explosion, the blast doors vanished as Zero
unleashed his vacuum effect.
The Merchants at the end of the "N" Tunnel barely had time to feel their bodies torn and twisted by the concussion.
--Doctor Zero#7
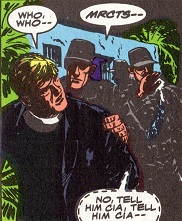
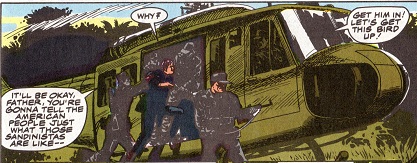
(St.
George#7 (fb)) - In Nicargua, the MRCTS attacked and slew Sandinistas
who had captured missionary Reverend Michael Devlin (who had been
helping local villagers). One of the Merchants introduces themselves as
MRCTS, but another whispered hastily, "No, tell him CIA!"
The MRCTS then took Devlin into a helicopter, telling him he would be
OK and that he would tell the American people what the Sandinistas were
like.
However, Devlin either fell or jumped from the helicopter (I think he jumped because he didn't trust the men who had rescued him). One of the MRCTS reported, "...Repeat Heavenly Kingdom, We've, uh, we've dropped the host."
--St. George#7
Note: Exact
timing for this flashback is unrevealed, but it presumably took place
between 1981-1987. The US government was backing the Contras against
the Sandinistas from 1981-1990. The Merchants formed shortly after an
event in 1980. And Devlin became involved with the Order of St. George
around 1988.
O'Neill was one of the Merchants loyal to Henry Clerk.
O'Neill and several others accompanied Gramon on a mission to eliminate the members of Powerline to prevent their spreading their knowledge of Clerk's true activities.
The group ambushed Powerline's Victor Guillermos and his uncle/ally, Ripley Weaver, plus Ripley's ally Murray on a subway during which time they killed the engineer.
When Murray used his ocular powers to sever a link between the subway cars to Victor and Ripley could escape, O'Neill and two others pursued their fleeing targets.
As they leapt between the cars,
O'Neill didn't make it, and he fell to the tracks below, yelling out in
pain.
--Doctor Zero#5
His first name was unrevealed.
I would ASSume that, even though
the cars were severed, the car behind was still moving rapidly and that
it ran over and slew O'Neill. But, that's unconfirmed.
I don't know if O'Neill is the one who had been previously blinded by Murray.
(Doctor Zero#6) - Agent Exorcist warned a commercial airliner away from restricted Merchants airspace. Exorcist then informed Oversight that they were clear.
Retler considered that they had become Oversight, an organization lost among a mass of bureaucratic paperwork; he determined that being overlooked and secretly preserving the USA made them good, pure, and right.
--Doctor Zero#6
Note: I'm not sure who Oversight was. I had initially thought this was Retler, but the more I review it, the more I think it was Major Preecit. Exorcist informed Oversight, and then Preecit informed Retler.
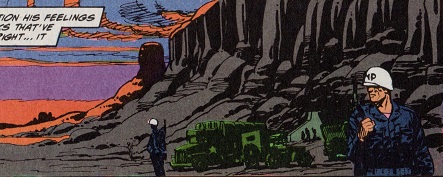
Rainier Mesa is a United States nuclear test region located in the Nevada desert.
It has extensive computer banks and houses the N Tunnel and the Zero Room.
(Doctor Zero#7 (fb) - BTS) - The MRCTS took over the operation of the Rainier Mesa Facility, and General Franklin Retler had Zero transferred there, hoping a nuclear test facility would be able to hold the powerful shadow in check.
(Doctor Zero#7 (fb) - BTS) - In the next six weeks at Ranier, the Merchants worked with minimal sleep and food in desperation to succeed; despite their training, they became progressively fatigued.
(Doctor Zero#7 (fb) - BTS) - Zero began subconsciously influencing everyone at Ranier. He fused the connections on various pieces of equipment and re-routed the readings to show the Merchants what they wanted to see. Meanwhile he progressively absorbed the energy he needed to revive.
Zero was kept in the "Zero Room" at the end of the "N" Tunnel.
Gaffney realized that Zero was affecting everyone. He rushed down to Zero, opened the pipe in which Zero was contained, and tried to get him to leave, but received no response.
(Doctor Zero#7 (fb) - BTS) - Retler collapsed from exhaustion.
(Doctor Zero#7) - Taking command, Major Preecit initated plans to simulate the force of a low yield nuclear weapon with C4 and TNT to test Zero.
Gaffney discovered that Zero had fused the connectors and re-routed the readings to show the Merchants what they wanted to see.
Realizing that everyone was in danger from Zero, Gaffney struck one of the Military Police, took his gun, and fired into the air to get everyone to flee. Preecit nonetheless conducted the test, but 16.5 milliseconds after the explosion, the blast doors vanished as Zero unleashed his vacuum effect. The Merchants at the end of the "N" Tunnel barely had time to feel their bodies torn and twisted by the concussion.
As
Zero took out everyone in his path, Preecit threw another agent in
front of her, and she fled as Zero destroyed him. Zero healed Gaffney's
leg (injured in the submarine confrontation) before catching up to
Preecit, fleeing in a RAF harrier, and causing her to fall to her death.
(Critical
Mass#1 (fb) - BTS) - Retler apparently suffered permanent damage to his left arm at Zero's hands.
--Doctor Zero#7
Note: Rainier Mesa is a real world location.
According to our friend Wikipedia, Rainier Mesa is one of four major nuclear test regions within the Nevada National Security Site (NNSS). It occupies approximately 40 square miles (100 km2) along the northern edge of the NNSS and corresponds to Area 12. The Rainier Mesa area consists of both Rainier Mesa proper and the contiguous Aqueduct Mesa. At 7,680 feet (2,340 m), the top of Rainier Mesa is the highest elevation within the NNSS. Area 12 held 61 nuclear tests between 1957 and 1992, one of which involved two detonations. All tests were conducted below Rainier and Aqueduct mesas.
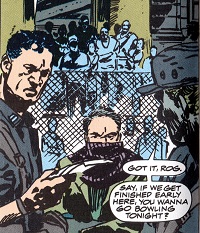
Rog (presumably short for Roger) and his friend were members of Henry Clerk's group of Merchants who took over Fort St. Vrean.
(Critical Mass#7/3) - Roger was in charge of the security area in which the citizens of Ft. St. Vrean were contained.
Receiving a hand-delivered memo from the mute Sgt. Gramon, Rog instructed his friend/subordinate that their orders were to execute the prisoners to prevent their interference with Professor Clerk's experiment.
Rog's friend/subordinate acknowledged this without a second thought, and then asked Rog if he wanted to go bowling if they finished up early.
(Critical Mass#7/3 (fb) - BTS)
- Soon after, Merchants lined up on the other side of the fence and
prepared to execute the prisoners before being stopped and
incapacitated by Devlin.
--Critical Mass#7
Note: It is
possible that Nighthunter took control of Rog and the other Merchants
preparing to execute the prisoners and had them transported out with
the remaining civilians.
If not, then they likely perished when Gordon Castle transported the city of Fort St. Vrean into space.
(Critical Mass#4/2) - Intercepting a transmission between Generals Getzer and Retler regarding Powerline's Victor Guillermos and Ripley Weaver reporting on Clerk's goals, Clerk instructed Gramon to "delete them from the equation."
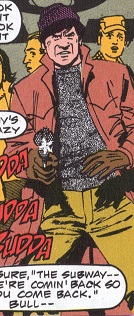
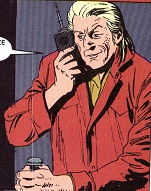
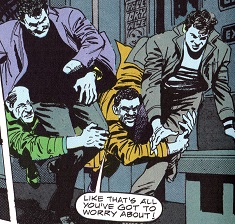
(Critical Mass#4/2) - Gramon and a number of Merchants (O'Neill was the only other one identified by name) ambushed Victor Guillermos, Ripley Weaver, and Murray in a Manhattan subway just after they got on at 42nd street.
One of them made the introduction, distracting Weaver by asking him if he wasn't "Ripper? The wrestler?" after which Gramon put a gun to Weaver's back.
Another Merchant then slew subway engineer/driver/motorman Jerry and took control of the train (re-routing it) before reporting that they were a go.
Weaver knocked away Gramon's gun hand and pushed him back, after which
Guillermos created a force field to block their attackers' bullets.
Guillermos' field weakened without being linked with the power of his partner, Lenore Castle,
it subsequently shorted out the electrical systems, causing a
blackout. 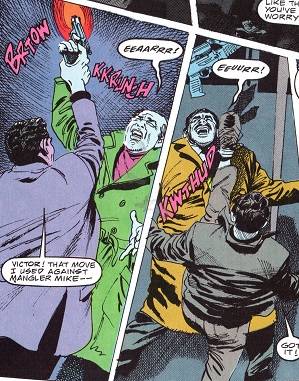
When Murray projected light to help Guillermos and Weaver escape, one of the Merchants grabbed Murray.
Murray increased his light's intensity to blind his attacker, then sent Guillermos and Weaver into the next car, after which he used lasers to sever the connection between cars.
Ignoring "the fat one" (Murray) as the other two were the primary
targets, a trio of Merchants jumped between the separating cars to
follow them, although O'Neill didn't make the jump and fell painfully
(and perhaps fatally).
 The two other Merchants tackled the fleeing
Guillermos and Weaver, but these two fought off the Merchants and then took
them out with an electrified chain and one of the Merchants' guns,
respectively.
The two other Merchants tackled the fleeing
Guillermos and Weaver, but these two fought off the Merchants and then took
them out with an electrified chain and one of the Merchants' guns,
respectively.
Gramon and at least another pair of Merchants pursued Weaver and Guillermos,
whose field buckled under the continued gunfire.
When the Merchant who had slain the driver confronted them at gunpoint, Weaver and Guillermos kicked out and dove out a window.
Guillermos' field proved strong enough to protect them from the impact of landing in water far below the bridge to which they had been re-routed.
Appreciating the connections and influence of their foes, Weaver convinced Guillermos they needed to ally with Doctor Zero to stop Clerk.
-- Critical Mass#4/2
A few of this group are shown in the main profile confronting Victor, Ripley, and Murray.
The blond guy with the walkie-talkie at the top
right of this sub-profile is the one who slew the subway's engineer.
He is also pictured here.
Used in nuclear testing at Rainier Mesa, the Zero Room was a cavern at the edge
of a tunnel with blast doors that could protect them from nuclear
explosions.
The big metal doors were welded shut, with everything beyond sucked dry of air and turned into a vacuum. Warheads were set off in a cavern at the far end of the "N" tunnel, with radiation traveling down the pipe at the speed of light, followed closely by the shockwave. Within 16 milliseconds, the blast doors exploded shut, trapping the shockwave in the cavern.
(Doctor Zero#7 (fb) - BTS) - The captured shadow known as Doctor Zero was kept in the "Zero Room."
Detached Naval officer Donald Gaffney realized that Zero was affecting everyone. He rushed down to Zero, opened the pipe, and tried to get him to leave, to no response.
(Doctor Zero#7) - Taking command, Major Preecit had Retler flown out to a specialist for treatment. She then initiated plans to simulate the force of a low yield nuclear weapon with C4 and TNT to test Zero.
Gaffney discovered that Zero had fused the connectors and re-routed the readings to show the Merchants what they wanted to see.
Realizing that everyone was in danger from Zero, Gaffney struck one of
the Military Police, took his gun, and fired into the air to get
everyone to flee.
Preecit nonetheless conducted the test, but 16.5
milliseconds after the explosion, the blast doors vanished as Zero
unleashed his vacuum effect.
The Merchants at the end of the "N" Tunnel barely had time to feel their bodies torn and twisted by the concussion.
--Doctor Zero#7
images: (without ads)
Doctor Zero#5, pg. 2, panel 1-3 (fan, ramp, and jet);
pg. 3, panel 4 (Retler lecturing to group);
#6, pg. 2, panel 4 (jet from above);
pg. 4, panel 1 (meeting discussing means to take down Zero);
pg. 5, panel 1 (nerve gas footage);
pg. 10 (SSBN Leviathan);
pg. 11, panel 6 (Leviathan controls);
pg. 15, panel 2-3 (Bruno; face & full);
pg. 16, panel 4 (Gunner; with gun);
pg. 17, panel 5 (Gunner, face, questioned by Zero);
pg. 20, panel 1 (sub rammed by orkas);
pg. 26, panel 6 (Hughes Glomar Explorer);
pg. 27, panel 4-6 (Clementine);
#7, pg. 5, panel 1 (Mount Weather entrance);
panel 4 (Marvins & staff working on Zero);
panel 5 (Marvins, face);
pg. 7, panel 7 (Marvins' aide smashing panel);
pg. 9, panel 1 (Marvins and aides incinerated);
pg. 12, panel 3 (Forbin system);
panel 5-6 (Hudson Holographic Image Processor);
pg. 15, panel 1 (Mount Weather; cavern, buildings);
pg. 16, panel 1-2 (Rainier Mesa exterior & interior);
pg. 17, panel 2 & 3 ("N' Tunnel & Zero Room);
pg. 20, panel 1 (Zero Room and "N" Tunnel);
St. George#7, pg. 11, panel 2 (Merchants on ground in Nicaragua);
panel 4 (Merchants helicopter in Nicaragua);
Critical Mass#4/2, pg. 18, panel 4 (group ambushing Ripley & Victor);
panel 7 (killing subway engineer/driver);
pg. 19, panel 2 (assault group member, full);
panel 6 (assault group member O'Neill attacking Murray);
pg. 20, panel 2-4 (two assault members
tackling Ripley & Victor and then getting beat down);
pg. 23, panel 2 (engineer killer face, straight);
#6 epilogue 2, last page, panel 1 (Clerk's Merchants killing
epilogue 2, pg. 1, panel 1 (fighter jets scrambling);
pg. 2 (assembled forces);
#7/3, pg. 11, panel 1-3 (Bob & Tony);
panel 6 (driver, face, partial);
pg. 12, panel 5 (driver, back of head, with gun);
pg. 14, panel 5 (Bob?; ready for a bone dart);
pg. 15, panel 5 (Clerk's troops in Ft. Vrean);
pg.16, panel 1 (Jack + 1);
panel 4 (Al +1);
panel 6 (Rog);
pg. 17, panel 2 (Merchant soldiers across fence, preparing to fire);
Appearances:
Doctor Zero#5 (December, 1988) - D.G.
Chichester and Margaret Clark (writers), Brett Ewins (penciler), Steve
Dillon (inker), Steve Buccellato (associate editor), Archie Goodwin
(editor-in-chief)
Saint George#5 (February, 1989) - D.G.
Chichester and Margaret Clark (writers), Klaus Janson (artist), Steve Buccellato (associate editor), Archie Goodwin
(editor-in-chief)
Doctor Zero#6 (February, 1989) - D.G.
Chichester and Margaret Clark (writers), Dan Spiegle (artist), Steve Buccellato (associate editor), Archie Goodwin
(editor-in-chief)
Doctor Zero#7 (April, 1989) - D.G.
Chichester and Margaret Clark (writers), Dan Spiegle (artist), Steve Buccellato (associate editor), Archie Goodwin
(editor-in-chief)
Saint George#7 (June, 1989) - D.G.
Chichester and Margaret Clark (writers), Dan Spiegle (artist), Steve Buccellato (associate editor), Archie Goodwin
(editor-in-chief)
Critical Mass#1 (January, 1990) - D.G.
Chichester and Margaret Clark (writers), Klaus Janson, Kevin O'Neill, Bill Sienkiewicz, Gray Morrow (artists), Marc McLaurin (managing editor), Carl Potts
(executive editor, Epic Comics)
Critical Mass#2 (February, 1990) - D.G.
Chichester and Margaret Clark (writers), Kyle Baker, Mark Texiera, Mike Manley (artists), Marc McLaurin (managing editor), Carl Potts
(executive editor, Epic Comics)
Critical Mass#3 (March, 1990) - D.G.
Chichester and Margaret Clark (writers), Ron Randall, Stan Drake, Grey Morrow, John Ridgway, Denys Cowan, Kent Williams (artists), Marc McLaurin (managing editor), Carl Potts
(executive editor, Epic Comics)
Critical Mass#4 (April, 1990) - D.G.
Chichester and Margaret Clark (writers), Jim Lee, Mike Manley, Dan Spiegle, Grey Morrow (artists), Marc McLaurin (managing editor), Carl Potts
(executive editor, Epic Comics)
Critical Mass#5 (May, 1990) - D.G.
Chichester and Margaret Clark (writers), Brett Blevins, Mike Manley, John Ridgway, Jorge Zaffino (artists), Marc McLaurin (managing editor), Carl Potts
(executive editor, Epic Comics)
Critical Mass#6 (June, 1990) - D.G.
Chichester and Margaret Clark (writers), Grey Morrow, John Ridgway, Jorge Zaffino, Dan Lawlis, Al Williamson, & James Sherman (artists), Marc McLaurin (managing editor), Carl Potts
(executive editor, Epic Comics)
Critical Mass#7 (July, 1990) - D.G.
Chichester and Margaret Clark (writers), Grey Morrow, John Ridgway, Jorge Zaffino, Dan Lawlis, Al Williamson, & James Sherman (artists), Marc McLaurin (editor), Carl Potts
(executive editor, Epic Comics)
First posted: 01/6/2019
Last updated: 01/6/2019
Any Additions/Corrections? please let me know.
Non-Marvel Copyright info
All other characters mentioned or pictured are ™ and
© 1941-2099 Marvel Characters, Inc. All Rights Reserved.
If you like this stuff, you should check out the real thing!
Please visit The Marvel Official Site at: http://www.marvel.com
Special Thanks to www.g-mart.com for hosting the Appendix, Master List, etc.!

 Marvins'
 Tony
Tony 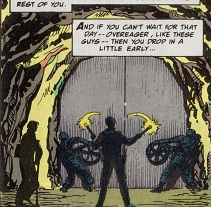
 "
"
 Mesa
Mesa