 MISS LOCKE
Real
Name: (First
name unrevealed) Locke
Identity/Class: Normal human
Occupation: Assistant
to Arcade
Group
Membership: None
Affiliations: Arcade,
Mr. Chambers, Cressida
Desford, Dominic Desford, Destiny (Irene Adler), Amos
Jardine, Moran,
Mystique (Raven Darkholme), Roak;
indirectly the Crazy
Gang (Executioner, Jester,
Knave, Red Queen,
Tweedledope), Major Domo, Mister Milbury (allies of Arcade and Miss
Locke whom Miss
Locke did not meet personally)
Enemies: Excalibur
(Lockheed, Meggan, Nightcrawler
(Kurt Wagner), Shadowcat (Kitty Pryde)), Elaine Grey, John Grey, Stevie
Hunter,
Moira MacTaggert, Illyana Rasputin, Judith Rassendyll, Courtney
Ross,
Amanda Sefton, Shatterstar
(Gaveedra-7), Candy
Southern, Betsy Wilford, Colleen Wing, X-Men (Banshee (Sean
Cassidy),
Colossus (Piotr Rasputin), Dazzler (Alison Blaire), Havok (Alex
Summers), Polaris (Lorna Dane), Rogue (Anna Marie), Storm (Ororo Munroe),
Wolverine
(James Howlett), X-Treme
(Adam Neramani);
indirectly Beast
(Hank McCoy), Captain Britain (Brian
Braddock), Cyclops
(Scott Summers), Iceman (Bobby Drake), Meggan, Phoenix (Rachel
Summers), Spider-Man (Peter Parker), (she aided Arcade during Arcade’s capture of them but did not
meet
them personally)
Known
Relatives: None
Aliases: "Doctor Doom"
(impersonated Dr. Doom
while trying to kill Arcade); "Dragon Lady" (Arcade’s nickname for
her)
Base
of Operations: Mobile
throughout various
Murderworld locations
First
Appearance: Marvel
Team-Up I#65 (January, 1978)
Powers/Abilities: Miss Locke
was quite skilled at
various forms of martial arts and often carried firearms to use if
needed. She
also had access to Arcade's Murderworld technology and robots, once
even
wearing a robotic shell of Doctor Doom in an effort to pose as Doom.
 History:
(Avengers
Arena#7
(fb) – BTS) – Despite working for
Arcade, Miss Locke hated Arcade and attempted to kill Arcade every year
on her
birthday, as suggested by Arcade himself.
(Uncanny
X-Men I#197 (fb) – BTS) –
At some point, Miss Locke moved from trying to kill Arcade on her own
birthday
to attempting to kill Arcade on his birthday.
(Marvel
Team-Up I#65) – As the
British Commission members Roak and Moran arrived at Britain’s Heathrow
Airport
to meet with Arcade, Miss Locke greeted them and explained that Arcade
was
expecting them. She then ushered them inside Arcade’s private 747 jet
to meet
Arcade in person.
(Marvel
Team-Up I#66) – Arcade,
Miss Locke and Mr. Chambers watched on video as the captive Captain
Britain and
Spider-Man were launched into Murderworld’s giant pinball machine.
Overhearing
Spider-Man ask what their captivity was all about, Arcade replied to
Miss
Locke and Mr. Chambers that it was about murder, gloating about how
Roak and
Moran had paid Arcade $1 million to kill Brian Braddock, hoping that
Braddock
was one of 50 people the Commission thought to be Captain Britain.
Arcade then
monologued to Miss Locke and Mr. Chambers about how much more Roak and
Moran
would pay him for actually killing Captain Britain, and Spider-Man as
well.
Arcade then told his assistants that he had a feeling this would be a
night to
remember. After Spider-Man and Captain Britain had been in Murderworld
for a
while, Miss Locke reported to Arcade that Spider-Man had gone off their
computer grid. Shortly after, Miss Locke reported that Spider-Man had
reappeared on their grid right outside the control room door. As
Spider-Man
rescued Captain Britain in a nearby room, Arcade flooded the room with
gas,
causing Murderworld’s computer systems to overload, causing explosions
that
destroyed Murderworld. Escaping to safety, Miss Locke later informed
Arcade
that she had learned of Roak and Moran’s death, meaning that Arcade
would not
get paid for the attempted assassination of Spider-Man and Captain
Britain, who
had also escaped.
(X-Men
I#123) – As part of a plot
to kill the X-Men on behalf of Black Tom Cassidy and Juggernaut, Miss
Locke
visited New York’s Metropolitan Opera House, where she led Nightcrawler
and
Colossus (as well as their dates) into a cell disguised as a
private
opera box. Once they had entered, Miss Locke had the cell airlifted
away with
the two X-Men inside. She then reported back to Arcade on the heroes’
capture.
Once all of the X-Men had been captured and placed inside Arcade’s
newly-rebuilt Murderworld, Miss Locke reported that the X-Men were
regaining
consciousness.
(X-Men
I#124/Marvel Team-Up I#89
(fb)) – As the X-Men fought their way through Murderworld, Miss Locke
informed
Arcade that she had taken care of the captive dates of the male X-Men
members
who had been captured alongside the X-Men. Arcade then ordered her to
start a
search pattern, as he had lost Cyclops and Nightcrawler within
Murderworld.
When Nightcrawler teleported into the control room, Miss Locke opened
fire on
the mutant, who knocked Miss Locke out and took her shotgun, tossing
it into
Arcade’s visual screen.
(Marvel
Team-Up I#89) – Recovered, Miss
Locke accompanied Arcade as he met with Amos Jardine to discuss why
Jardine
had replaced Arcade as the proposed assassin of Spider-Man. When Amos
monologued that no one treated him like Arcade had, Miss Locke warned
Jardine
that Arcade was to be feared as she also was. Laughing, Jardine
threatened Miss
Locke, who tossed Jardine on top of the hood of Jardine’s car. She then
warned
Jardine not to make Arcade more angry, as Jardine might find himself
inside
Murderworld.
 (Uncanny
X-Men I#145/Uncanny
X-Men I#147 (fb)) – Miss Locke confronted Storm and Stevie Hunter at
the
Metropolitan Opera House, where she admitted that she had drugged them
both. As
Storm began to pass out, Miss Locke revealed that she had kidnapped the
X-Men’s
loved ones in order to force them to rescue X-Men from Doctor Doom
(secretly a
Doombot disguised as the true Doom).
(Uncanny
X-Men I#146) – When a
substitute X-Men team invaded Murderworld to stop Miss Locke, she
appeared to
them as a hologram, welcoming them to Murderworld. She then activated
trap
doors that sent each of them to a different area of Murderworld. Later,
when
Havok escaped into the maintenance tunnels, Mr. Chambers reported a
system
malfunction in Sector 12 and prepared to investigate. After blasting
Mr.
Chambers, Havok confronted Miss Locke and blasted the gun from her
hand. The
substitute X-Men then rescued the hostages Miss Locke had taken
(The
Daredevils#4) – Miss Locke
brought Arcade the phone while Arcade was watching the "Sgt. Bilko"
television show. She
informed
Arcade that it was the British criminal mastermind, the Vixen, who had
called
to inform Arcade that the Slaymaster had failed to kill Captain Britain.
(Uncanny
X-Men I#177) – Miss
Locke accompanied Arcade in visiting Mystique following a Murderworld
duel.
(Wolverine/Nick
Fury: The Scorpio
Connection) – After having trapped the X-Men in Murderworld once more,
Arcade
(secretly a robot) was told that the X-Men had found the control room
and were
in the direct access tunnel by Miss Locke. When the X-Men burst into
the
control room, "Arcade" excused Miss Locke, claiming he would deal with
the
X-Men himself.
 (Uncanny
X-Men I#197) – Miss
Locke accompanied Arcade for breakfast after he had captured the
X-Men’s
Colossus and Shadowcat in hopes that they could protect him from a hit
placed
on his head by Doctor Doom. When a hunter-seeker missile smashed
through the
window, Miss Locke ran from the table as Shadowcat disabled the missile
with
her phasing powers. Soon after, Arcade explained the situation to
Colossus and
Shadowcat, revealing that Miss Locke was ordered to kill Colossus and
Shadowcat’s loved ones in the same fashion as Arcade’s death should
they fail
to protect Arcade. After Colossus and Shadowcat had defeated “Doctor
Doom,”
Miss Locke emerged from the shell of “Doom,” revealing that she had
been posing
as Doom in an attempt to kill Arcade on his birthday. Arcade then
explained to
Colossus and Shadowcat that every year on his birthday, Miss Locke was
allowed
24 hours to attempt to kill Arcade. Sharing a glass of wine and
celebrating
Arcade’s birthday, Miss Locke exclaimed that next year, she would dance
on
Arcade's grave.
(Uncanny
X-Men I#197) – Miss
Locke accompanied Arcade for breakfast after he had captured the
X-Men’s
Colossus and Shadowcat in hopes that they could protect him from a hit
placed
on his head by Doctor Doom. When a hunter-seeker missile smashed
through the
window, Miss Locke ran from the table as Shadowcat disabled the missile
with
her phasing powers. Soon after, Arcade explained the situation to
Colossus and
Shadowcat, revealing that Miss Locke was ordered to kill Colossus and
Shadowcat’s loved ones in the same fashion as Arcade’s death should
they fail
to protect Arcade. After Colossus and Shadowcat had defeated “Doctor
Doom,”
Miss Locke emerged from the shell of “Doom,” revealing that she had
been posing
as Doom in an attempt to kill Arcade on his birthday. Arcade then
explained to
Colossus and Shadowcat that every year on his birthday, Miss Locke was
allowed
24 hours to attempt to kill Arcade. Sharing a glass of wine and
celebrating
Arcade’s birthday, Miss Locke exclaimed that next year, she would dance
on
Arcade's grave.
 (Uncanny
X-Men I#204) – After
Arcade was paid to kidnap Judith Rassendyll, the unknowing queen of
Ruritania,
Miss Locke reported to Arcade that Murderworld was online and ready.
Running
the student through the rigors of Murderworld, Arcade was surprised
when
Nightcrawler teleported in to rescue the girl. Using one of
Murderworld’s
planes, Nightcrawler left the girl, prompting Miss Locke to remind
Arcade that
Nightcrawler’s desertion of the girl seemed uncharacteristic and that
it could
be a deception on Nightcrawler’s part. Arcade then replied that whether
or not
it was a deception would not matter once Miss Locke had found and
killed
Nightcrawler. Miss Locke and Arcade were shortly thereafter surprised
when the
“X-Men” busted in and attempted to take Arcade into custody for
kidnapping
Judith and Nightcrawler, but Arcade was not fooled and soon realized
that
Nightcrawler had located Arcade’s X-Men robots and sent them after
Arcade in
order to mask Nightcrawler’s escape.
(Uncanny
X-Men I#204) – After
Arcade was paid to kidnap Judith Rassendyll, the unknowing queen of
Ruritania,
Miss Locke reported to Arcade that Murderworld was online and ready.
Running
the student through the rigors of Murderworld, Arcade was surprised
when
Nightcrawler teleported in to rescue the girl. Using one of
Murderworld’s
planes, Nightcrawler left the girl, prompting Miss Locke to remind
Arcade that
Nightcrawler’s desertion of the girl seemed uncharacteristic and that
it could
be a deception on Nightcrawler’s part. Arcade then replied that whether
or not
it was a deception would not matter once Miss Locke had found and
killed
Nightcrawler. Miss Locke and Arcade were shortly thereafter surprised
when the
“X-Men” busted in and attempted to take Arcade into custody for
kidnapping
Judith and Nightcrawler, but Arcade was not fooled and soon realized
that
Nightcrawler had located Arcade’s X-Men robots and sent them after
Arcade in
order to mask Nightcrawler’s escape.
 (Marvel
Fanfare I#50 (fb)) – Miss
Locke was present by Arcade’s side when he met with Cressida Desford,
who had
earlier hired Arcade to kill Warren Worthington III for posing as part
of the
mutant-hunting X-Terminators. As Arcade viewed film footage of Warren
as the
Angel, whom he hurled darts at, Miss Locke reminded Arcade that he was
ripping
holes in the film screen. Arcade reminded her that they were on
Cressida’s
expense account and assured Miss Locke he was not worried about money
to buy a
new screen. Arcade eventually explained to Ms. Desford that he would
agree to
kill any two of Warren’s teammates in place of the supposedly-deceased
Angel
and shortly thereafter disguised himself, reporting to Miss Locke that
the
Beast and Iceman had been led into Murderworld by following Ms.
Desford’s son
Dominic into the trap. Once Beast and Iceman had entered the main
entrance,
Miss Locke warned the two heroes via loudspeaker not to linger at the
entrance
and continue into the Murderworld maze. When Beast and Iceman found
their way
into the laser projector areas, Miss Locke reported to Arcade that the
heroes
seemed to have found their way out of the first maze area and Arcade
reminded her
that they couldn’t have the heroes escaping so soon, throwing a switch
that
opened the trap door floor of the maze area. As Dominic Desford was
nearly shot
by lasers trying to help Iceman, Cressida pushed her way past Miss
Locke and
Arcade to hit a switch to turn the lasers off. Warning Cressida not to
touch
his controls, Arcade ordered Miss Locke to allow Cressida access to
their
loudspeakers to tell Dominic to stay out of danger. Dominic refused,
wanting to
help Iceman, and Arcade then allowed Cressida to enter Murderworld to
retrieve
Dominic. Once Dominic was placed back in Murderworld’s control room
with Arcade
and Miss Locke, Arcade began draining the air out of the maze area to
continue
his efforts to kill Beast and Iceman. Not caring whether Cressida died
with
them, Arcade and Miss Locke were stopped by Dominic, who briefly
managed to get
control of the loudspeakers and warn his mother that Arcade had tricked
her. At
Cressida’s request, Arcade agreed to terminate their agreement to kill
Beast
and Iceman, warning the heroes and Cressida that the Murderworld maze
area had
been rigged to explode in 10 minutes. When Arcade commented that
Dominic had
spunk, Miss Locke exclaimed that she had rather Dominic been
Murderworld’s
target, rather than one of their clients.
(Marvel
Fanfare I#50 (fb)) – Miss
Locke was present by Arcade’s side when he met with Cressida Desford,
who had
earlier hired Arcade to kill Warren Worthington III for posing as part
of the
mutant-hunting X-Terminators. As Arcade viewed film footage of Warren
as the
Angel, whom he hurled darts at, Miss Locke reminded Arcade that he was
ripping
holes in the film screen. Arcade reminded her that they were on
Cressida’s
expense account and assured Miss Locke he was not worried about money
to buy a
new screen. Arcade eventually explained to Ms. Desford that he would
agree to
kill any two of Warren’s teammates in place of the supposedly-deceased
Angel
and shortly thereafter disguised himself, reporting to Miss Locke that
the
Beast and Iceman had been led into Murderworld by following Ms.
Desford’s son
Dominic into the trap. Once Beast and Iceman had entered the main
entrance,
Miss Locke warned the two heroes via loudspeaker not to linger at the
entrance
and continue into the Murderworld maze. When Beast and Iceman found
their way
into the laser projector areas, Miss Locke reported to Arcade that the
heroes
seemed to have found their way out of the first maze area and Arcade
reminded her
that they couldn’t have the heroes escaping so soon, throwing a switch
that
opened the trap door floor of the maze area. As Dominic Desford was
nearly shot
by lasers trying to help Iceman, Cressida pushed her way past Miss
Locke and
Arcade to hit a switch to turn the lasers off. Warning Cressida not to
touch
his controls, Arcade ordered Miss Locke to allow Cressida access to
their
loudspeakers to tell Dominic to stay out of danger. Dominic refused,
wanting to
help Iceman, and Arcade then allowed Cressida to enter Murderworld to
retrieve
Dominic. Once Dominic was placed back in Murderworld’s control room
with Arcade
and Miss Locke, Arcade began draining the air out of the maze area to
continue
his efforts to kill Beast and Iceman. Not caring whether Cressida died
with
them, Arcade and Miss Locke were stopped by Dominic, who briefly
managed to get
control of the loudspeakers and warn his mother that Arcade had tricked
her. At
Cressida’s request, Arcade agreed to terminate their agreement to kill
Beast
and Iceman, warning the heroes and Cressida that the Murderworld maze
area had
been rigged to explode in 10 minutes. When Arcade commented that
Dominic had
spunk, Miss Locke exclaimed that she had rather Dominic been
Murderworld’s
target, rather than one of their clients.
 (Excalibur
I#4) – Miss Locke was
present when Arcade kidnapped Excalibur’s banker and Captain Britain’s
ex-girlfriend Courtney Ross to his newly built British Murderworld
complex.
Arcade soon forced Courtney into a room where she was forced to perform
stand-up comedy or die by being crushed by a giant foot. Watching Ross
perform
the comedy, Miss Locke smiled, much to the shock of Arcade, who
demanded to
know what was going on. Surprised that Ross was actually funny, Arcade
asked
where Ross got off being like Bette Midler and Miss Locke replied that
perhaps
necessity was the mother of invention. Excalibur soon came in search of
Courtney, where they battled Arcade’s allies, the Crazy Gang, who
switched
their minds with some of the Excalibur members. Miss Locke reported a
miscalculation on Arcade’s part when Phoenix defeated the Crazy Gang’s
Executioner. Arcade reminded Miss Locke that Phoenix would get hers in
the end
then ordered Miss Locke to scan for Phoenix and the missing Shadowcat.
Miss
Locke then reported that there was no need to scan for Phoenix, as she
was on
the video screen assuming the mantle of the Executioner. As Locke
watched,
Arcade then switched his focus to Courtney Ross, who fell through a
trap door
while Arcade gloated over a large video screen that he had not
forgotten about
Shadowcat.
(Excalibur
I#5) – Miss Locke was
present with Mr. Chambers and Arcade as Excalibur (in the Crazy Gang’s
bodies)
battled the Crazy Gang (in Excalibur’s bodies) inside a "Wizard of Oz"
themed
room in Murderworld. Locke asked Arcade if Arcade was growing bored and
Arcade
warned Locke to be quiet or she might become Murderworld’s next victim.
Miss
Locke and Arcade’s argument was interrupted by Shadowcat, who phased
through
Arcade’s control computer and pulled him into Murderworld, leaving
Lockheed to
guard against Locke and Chambers. When Chambers failed to defeat
Lockheed while
wearing a semi-fireproof suit, shield and mace, Miss Locke seduced
Lockheed,
allowing Locke and Chambers to escape while Excalibur brought Arcade
into
custody.
(X-Force
I#29) – Observing his
potential target, X-Force’s Shatterstar, from afar, Arcade asked Miss
Locke of
Shatterstar’s location and she replied he was in Phoenix, Arizona. When
Miss
Locke informed Arcade that it was his idea to take their assassinations
on the
road, Arcade explained that at least they could see the sights. After
Miss
Locke commented that they could always see the Petrified Forest
National Park,
Arcade told her that no one liked a "Weisenheimer" and asked for audio
on
Shatterstar. Arcade then decided that Shatterstar would make for lots
of fun
and ordered Miss Locke to get the day’s other participant into “makeup
and
wardrobe.” He then told her contact their clients and inform them that
Arcade
was ready to begin. Shortly after Shatterstar had been captured and
dropped off
in Murderworld, Arcade had Miss Locke prod Shatterstar to wake up.
(X-Force
I#30) – As Arcade forced
Shatterstar to battle another captive, X-Treme, Miss Locke watched as
Arcade
gloated about how his client, Major Domo of the Mojoverse, had provided
Shatterstar’s wife, Windsong (actually a crystalline-based laser
holo-image),
without explaining to Arcade of Windsong’s relationship to Shatterstar.
Shortly
after Shatterstar directed X-Treme to take out Arcade’s cameras, Arcade
demanded to know from Miss Locke what was going on inside his portable
Murderworld. Miss Locke replied that if she could venture a guess, the
two
heroes were on their way to slice Arcade into pieces. Arcade then began
ordering his crew to call the clients to inform them of a failure but
Miss
Locke reminded Arcade that while both she and Arcade knew that they did
not
have actual physical access to Windsong, Shatterstar and X-Treme did
not.
Content to continue plotting against the heroes with that knowledge,
Arcade
continued to manipulate Shatterstar and X-Treme until the heroes made
their way
near Arcade’s control room, at which point Arcade ordered Miss Locke to
contact
Major Domo and their other client, Mr. Milbury, that Arcade would be
returning
the money he was paid to kill the two heroes. Shatterstar immediately
demanded
that Miss Locke turn “Windsong” over or risk a horrible death. Miss
Locke
agreed to do so, pulling up the Windsong holo-image once more and
having
it
plead with Shatterstar to kill X-Treme and gain freedom. Miss Locke
then explained
to Shatterstar that “Windsong’s” manacles were rigged to explode and
warned
that if Shatterstar made one move, she would kill “Windsong.” Not
wishing to
kill X-Treme or put “Windsong” in further danger, Shatterstar impaled
himself
with his own swords, much to the shock of Miss Locke. X-Treme then
prepared to
kill Arcade, who was stabbed by a recovering Shatterstar, revealing
that Arcade
had replaced himself with a robot facsimile at some point to cover his
escape.
Shatterstar then confronted Miss Locke, warning her that both Arcade
and his
clients had made a big mistake that would not be forgotten.
(Wolverine/Gambit:
Victims#4 (fb)/Avengers
Arena#7 (fb)) – During another attempt on Arcade’s life on his
birthday, Miss
Locke grabbed a kitchen knife and came dangerously close to succeeding
at her
attempt to kill Arcade, horribly disfiguring Arcade’s face. Fighting
back,
Arcade killed Locke with her own weapon. Unable to cope with actually
killing
Locke, Arcade devised a game, using Wolverine robots in an attempt to
frame
Wolverine as a new “Jack the Ripper”-style London killer, placing
Locke’s body
amongst those slain by the Wolverine robots.
(Colossus#1
(fb) – BTS) – Arcade created
a robot of Miss Locke and programmed her with Miss Locke’s personality.
Comments: Created by Chris
Claremont, John Byrne
and Dave Hunt.
After
Miss Locke’s death by
Arcade’s hands, she was replaced by a robot with her personality. Any
of “Miss
Locke’s” appearances since (namely Thing II#1-3) would be considered
the robot
and therefore, are not appearances of the actual Miss Locke. As such,
they
are not included in this profile.
Roak and Moran's deaths were reported right after Jean DeWolff told Spidey and Captain Britain that heads of the European Maggia crime families had been wiped out (by Sabrina Morrel, according to some fan sources, but never specified in any actual book as far as I know).
--astrocitizen
Profile
by Proto-Man.
CLARIFICATIONS:
Miss Locke has no
known connections to:
- Locke, Alexander of Earth-700 - father of Cassandra, assisted Gene in exposing history of Skrull treachery @ Marvel: Lost Generation#8
- Locke, Cassandra of Earth-700 - daughter of Alexander, traveled back in time to identify history of Skrull treachery @ Marvel: Lost Generation#12
- Locke, Ted - special effects man, missing both hands, ally of Human Fly @ Human Fly#1
- Locke, Jeremy K. - killed by Elektra to take down the last of the Hand @ Elektra II#11
- Locke, - S.H.I.E.L.D., Operation: Lightning Storm, Psy-Ops liaison @ Ms. Marvel I#13
- Locke, Dr. - Hydra, attempted to take brainwash Madrox, crushed to death by him @ X-Factor III#15
- or any other "Miss" or "Locke"
characters
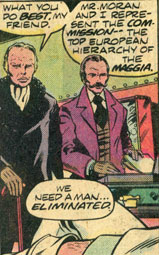
Roak
and Moran were
members of the Commission, the
European hierarchy of the Maggia crime syndicate. After having narrowed
down a
list to 50 people that could been Captain Britain, Roak and Moran
contacted
Arcade to kill a person on their list: Brian Braddock. Flying to
London’s
Heathrow Airport, Miss Locke led Roak and Moran to meet with Arcade
aboard
Arcade's private jet, where they discussed having Braddock assassinated
via
Arcade's Murderworld theme park. Roak and Moran got killed during a lone wolf's attack on the Maggia's Commission. (see comments)
Their deaths were reported to Arcade by Miss Locke after he failed to kill Captain
Britain.
--Marvel
Team-Up I#65 (#66d - BTS
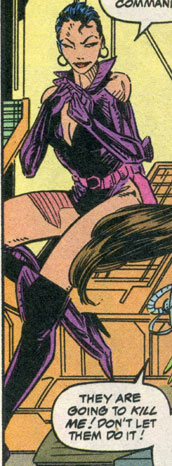
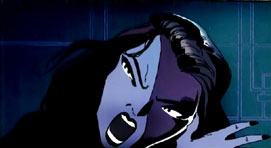
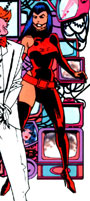
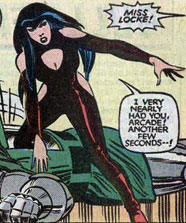
images: (without ads)
X-Force I#30, p19, pan1 (Miss Locke, main image)
Wolverine/Gambit: Victims#4, p17, pan2 (Miss Locke, headshot)
Wolverine/Nick Fury: The Scorpio Connection, p9, pan3 (Miss Locke,
classic red
outfit)
Uncanny X-Men I#197, p20, pan2 (Miss Locke, updated red outfit)
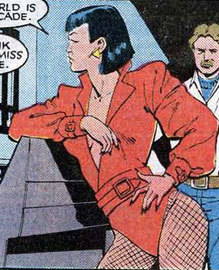
Uncanny X-Men I#204, p8, pan4 (Miss Locke, with fishnets)
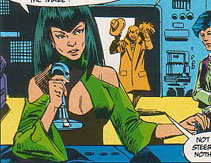
Marvel Fanfare I#50, p10, pan1 (Miss Locke, green outfit)
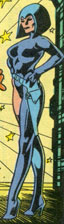
Excalibur I#4, p13, pan5 (Miss Locke, black outfit)
Marvel Team-Up I#65, p4, pan5 (Roak & Moran)
Appearances:
Marvel Team-Up I#65 (January, 1978) – Chris Claremont (writer), John
Byrne
(art), Dave Hunt (inks, colors), Archie Goodwin (editor)
Marvel Team-Up I#66 (February, 1978) – Chris Claremont (writer), John
Byrne
(art), Dave Hunt (inks, colors), Archie Goodwin (editor)
X-Men I#123 (July, 1979) – Chris Claremont (writer), John Byrne
(pencils),
Terry Austin (inks), Roger Stern (editor)
X-Men I#124 (August, 1979) – Chris Claremont (writer, plot), John Byrne
(plot,
pencils), Terry Austin (inks), Roger Stern (editor)
Marvel Team-Up I#89 (January, 1980) – Chris Claremont (writer), Michael
Nasser,
Rich Buckler (pencils), Josef Rubinstein (inks), Allen Milgrom (editor)
Uncanny X-Men I#145 (May, 1981) – Chris Claremont (writer), Dave
Cockrum, Joe
Rubinstein (art), Louise Jones (editor)
Uncanny X-Men I#146 (June, 1981) – Chris Claremont (writer), Dave
Cockrum,
Josef Rubinstein (art), Louise Jones (editor)
Uncanny X-Men I#147 (July, 1981) – Chris Claremont (writer), Dave
Cockrum,
Josef Rubinstein (art), Louise Jones (editor)
The Daredevils#4 (April, 1983) – Alan Moore (writer), Alan Davis (art),
Bernie
Jaye (editor)
Uncanny X-Men I#177 (January, 1984) – Chris Claremont (writer), John
Romita,
Jr. (pencils), John Romita, Sr. (inks), Eliot Brown (editor)
Uncanny X-Men I#197 (September, 1985) – Chris Claremont (writer), John
Romita,
Jr., Dan Green (art), Ann Nocenti (editor)
Uncanny X-Men I#204 (April, 1986) – Chris Claremont (writer), June
Brigman
(pencils), Whilce Portacio (inks), Ann Nocenti (editor)
Wolverine/Nick Fury: The Scorpio Connection (1989) – Archie Goodwin
(writer),
Howard Chaykin (art), Gregory Wright, Mark Gruenwald (editors)
Excalibur I#4 (January, 1989) – Chris Claremont (writer), Alan Davis
(pencils),
Paul Neary (inks), Terry Kavanagh (editor)
Excalibur I#5 (February, 1989) – Chris Claremont (writer), Alan Davis
(pencils), Paul Neary (inks), Terry Kavanagh (editor)
Marvel Fanfare I#50 (April, 1990) – Jo Duffy (writer), Joe Staton
(pencils),
Joe Rubinstein (inks), Bob Harras, Al Milgrom (editors)
X-Force I#29 (December, 1993) – Fabian Nicieza (writer), Matt Broome
(pencils),
Bud LaRosa (inks), Bob Harras (editor)
X-Force I#30 (January, 1994) – Fabian Nicieza (writer), Tony Daniel
(pencils), Kevin
Conrad, Jon Holdredge, Jason Gorder (inks), Bob Harras (editor)
Wolverine/Gambit: Victims#4 (December, 1995) – Jeph Loeb (writer), Tim
Sale (art),
Mark Powers (editor)
Colossus#1 (October, 1997) – Ben Raab (writer), Bryan Hitch (pencils),
Paul
Neary (inks), Matt Idelson (editor)
Avengers Arena#7 (June, 2013) – Dennis Hopeless (writer), Alessandro
Vitti
(art), Bill Rosemann (editor)
First Posted: 09/15/2013
Last
updated: 09/10/2016
Any
Additions/Corrections? please
let me know.
Non-Marvel Copyright info
All other characters mentioned or pictured are ™ and ©
1941-2099 Marvel Characters,
Inc. All Rights Reserved. If you like this stuff, you should check out
the real
thing!
Please visit The Marvel Official Site at: http://www.marvel.com
Special Thanks to www.g-mart.com for hosting the Appendix, Master List, etc.!